1. Does your computer support booting from USB ?
?
Usually, if its an option in your BIOS boot sequence menu, the answer to this is yes. If its not there, look for BIOS updates. If you are not sure, proceed and see what happens
2. Sorting out the "Bootability" of your USB-Drive
Connect your USB drive to your computer, directly, without a Hub. Then, shut down your computer, disconnect any other hard disk drives from it, and insert your original Windows XP CD into the drive. Start the installation, and proceed to the section where you are allowed to pick a hard drive. If it goes beyond the partition selection, your drive is already fine for booting Windows XP. If not (seems to be the cases with many of the Freecom USB HDDs for example), you will get an error like "Windows is unable to find your drive, partition, data etc bla". This is usually not a big problem.
 All you need to do is "properly" format the drive. Reboot into your normal Windows, and get this HP tool
 , and use it to format your HDD completely. I chose NTFS format, worked fine everytime i tried. After this, my drives are recognized as valid installation devices by the Windows XP installer.
(In fact, i did not manage to create a USB primary partition with FAT32 that was recognized as being installable)
3. Dumping the original Windows CD into an ISO File
Pretty easy one. Simply open WinISO, and select Actions -> Make ISO from CDROM, and save your CD image.
4. Extracting the files we need to work on
After the CD dump is done, close and reopen WinISO. Then, open the ISO file you just created using File -> Open.
Now, click the I386 folder, and select the following files (Ctrl key to multi-select)
TXTSETUP.SIF
DOSNET.INF
USB.IN_
USBPORT.IN_
USBSTOR.IN_
Select Actions -> Extract and put the resulting files into some folder to work on them.
5. Unpacking IN_ files
Use the Cab SDK (from the command line) for extracting the contents of the .IN_ files. Each of them contains exactly one .inf file. If you are unsure how to use the Cab SDK, here is an example command line:
cabarc x USBSTOR.IN_
You should end up with three new files in the folder, called:
usb.inf
usbport.inf
usbstor.inf
You can now delete the .IN_ files.
6. Editing the files
This is the main job. i ll also try to explain a bit whats happening. Use a simple Texteditor like Notepad.
TXTSETUP.SIF
This file is loaded on the initial install step by the Windows XP CD installer. In this file, we will change the way Windows treats USB devices during system setup -- the default is to only treat them as input devices during installation -- we will change this to include mass storage driver support (which needs to be loaded into the installer much earlier in order to work).
First, move the following entries from [InputDevicesSupport.Load] to the [BootBusExtenders.Load] section , as shown here
[BootBusExtenders.Load]
pci = pci.sys
acpi = acpi.sys
isapnp = isapnp.sys
acpiec = acpiec.sys
ohci1394 = ohci1394.sys
usbehci = usbehci.sys
usbohci = usbohci.sys
usbuhci = usbuhci.sys
usbhub = usbhub.sys
usbstor = usbstor.sys
[InputDevicesSupport.Load]
usbehci = usbehci.sys
usbohci = usbohci.sys
usbuhci = usbuhci.sys
usbhub = usbhub.sys
usbccgp = usbccgp.sys
hidusb = hidusb.sys
serial = serial.sys
serenum = serenum.sys
usbstor = usbstor.sys
... now the same for [BootBusExtenders] and [InputDevicesSupport]
[BootBusExtenders]
pci = "PCI-Bustreiber",files.pci,pci
acpi = "ACPI Plug & Play-Bustreiber",files.acpi,acpi
isapnp = "ISA Plug & Play-Bustreiber",files.isapnp,isapnp
acpiec = "Integrierter ACPI-Controllertreiber",files.none,acpiec
ohci1394 = "IEEE-1394-Bus-OHCI-konformer Anschlusstreiber",files.ohci1394,ohci1394
usbehci = "Erweiterter Hostcontroller",files.usbehci,usbehci
usbohci = "Open Hostcontroller",files.usbohci,usbohci
usbuhci = "Universeller Hostcontroller",files.usbuhci,usbuhci
usbhub = "Standard-USB-Hubtreiber",files.usbhub,usbhub
usbstor = "USB-Speicherklassentreiber",files.usbstor,usbstor
[InputDevicesSupport]
usbehci = "Erweiterter Hostcontroller",files.usbehci,usbehci
usbohci = "Open Hostcontroller",files.usbohci,usbohci
usbuhci = "Universeller Hostcontroller",files.usbuhci,usbuhci
usbhub = "Standard-USB-Hubtreiber",files.usbhub,usbhub
hidusb = "HID-Parser",files.hidusb,hidusb
serial = "Treiber fur seriellen Anschluss",files.none,serial
serenum = "Enumerator fur seriellen Anschluss",files.none,serenum
usbstor = "USB-Speicherklassentreiber",files.usbstor,usbstor
usbccgp = "USB Generic Parent Driver",files.usbccgp,usbccgp
Next, we also have to write several keys into the registry. Convieniently, the txtsetup.sif allows you to specify files that are parsed and instered into the registry at install time. Insert the following in the [HiveInfs.Fresh] section:
[HiveInfs.Fresh]
AddReg = hivedef.inf,AddReg
AddReg = hivesys.inf,AddReg
AddReg = hivesft.inf,AddReg
AddReg = hivecls.inf,AddReg
AddReg = hiveusd.inf,AddReg
AddReg = dmreg.inf,DM.AddReg
AddReg = usbboot.inf,usbservices
and also in [SourceDisksFiles]
[SourceDisksFiles]
usbboot.inf = 1,,,,,,_x,3,,3
bootvid.dll = 1,,,,,,3_,2,0,0,,1,2
kdcom.dll = 1,,,,,,3_,2,0,0,,1,2
Finally, save and close TXTSETUP.SIF. We are done with it.
DOSNET.INF
Now, open DOSNET.INF , and change the second [Files] section to look like this:
[Files]
d1,usbboot.inf
d1,_default.pif
d1,12520437.cpx
d1,12520850.cpx
usb.inf
Change the bolded lines in the [StandardHub.AddService] and [CommonClassParent.AddService] sections:
[StandardHub.AddService]
DisplayName = %StandardHub.SvcDesc%
ServiceType = 1 ; SERVICE_KERNEL_DRIVER
StartType = 0 ; SERVICE_DEMAND_START
ErrorControl = 1 ; SERVICE_ERROR_NORMAL
ServiceBinary = %12%\usbhub.sys
LoadOrderGroup = Boot Bus Extender
[CommonClassParent.AddService]
DisplayName = %GenericParent.SvcDesc%
ServiceType = 1 ; SERVICE_KERNEL_DRIVER
StartType = 0 ; SERVICE_DEMAND_START
ErrorControl = 1 ; SERVICE_ERROR_NORMAL
ServiceBinary = %12%\usbccgp.sys
LoadOrderGroup = Boot Bus Extender
usbport.inf
Change the bolded lines in the [EHCI.AddService], [OHCI.AddService] , [UHCI.AddService] and [ROOTHUB.AddService] sections:
[EHCI.AddService]
DisplayName = %EHCIMP.SvcDesc%
ServiceType = 1 ; SERVICE_KERNEL_DRIVER
StartType = 0 ; SERVICE_DEMAND_START
ErrorControl = 1 ; SERVICE_ERROR_NORMAL
ServiceBinary = %12%\usbehci.sys
LoadOrderGroup = Boot Bus Extender
[OHCI.AddService]
DisplayName = %OHCIMP.SvcDesc%
ServiceType = 1 ; SERVICE_KERNEL_DRIVER
StartType = 0 ; SERVICE_DEMAND_START
ErrorControl = 1 ; SERVICE_ERROR_NORMAL
ServiceBinary = %12%\usbohci.sys
LoadOrderGroup = Boot Bus Extender
[UHCI.AddService]
DisplayName = %UHCIMP.SvcDesc%
ServiceType = 1 ; SERVICE_KERNEL_DRIVER
StartType = 0 ; SERVICE_DEMAND_START
ErrorControl = 1 ; SERVICE_ERROR_NORMAL
ServiceBinary = %12%\usbuhci.sys
LoadOrderGroup = Boot Bus Extender
[ROOTHUB.AddService]
DisplayName = %ROOTHUB.SvcDesc%
ServiceType = 1 ; SERVICE_KERNEL_DRIVER
StartType = 0 ; SERVICE_DEMAND_START
ErrorControl = 1 ; SERVICE_ERROR_NORMAL
ServiceBinary = %12%\usbhub.sys
LoadOrderGroup = Boot Bus Extender
usbstor.inf
Change / Add [USBSTOR.AddService] section to this:
[USBSTOR.AddService]
DisplayName = %USBSTOR.SvcDesc%
ServiceType = 1
StartType = 0
Tag = 3
ErrorControl = 1
ServiceBinary = %12%\USBSTOR.SYS
LoadOrderGroup = Boot Bus Extender
new file: USBBOOT.INF
Create a new file called USBBOOT.INF in the same directory as your other changed files, and put the following content into it:
[usbservices]
HKLM,"SYSTEM\CurrentControlSet\Services\USBSTOR","DisplayName",0x00000000,"USB Mass Storage Driver"
HKLM,"SYSTEM\CurrentControlSet\Services\USBSTOR","ErrorControl",0x00010001,1
HKLM,"SYSTEM\CurrentControlSet\Services\USBSTOR","Group",0x00000000,"System Reserved"
HKLM,"SYSTEM\CurrentControlSet\Services\USBSTOR","ImagePath",0x00020000,"system32\DRIVERS\USBSTOR.SYS"
HKLM,"SYSTEM\CurrentControlSet\Services\USBSTOR","Start",0x00010001,0
HKLM,"SYSTEM\CurrentControlSet\Services\USBSTOR","Type",0x00010001,1
HKLM,"SYSTEM\CurrentControlSet\Services\usbehci","DisplayName",0x00000000,"USB 2.0 Enhanced Host Controller Miniport Driver"
HKLM,"SYSTEM\CurrentControlSet\Services\usbehci","ErrorControl",0x00010001,1
HKLM,"SYSTEM\CurrentControlSet\Services\usbehci","Group",0x00000000,"System Reserved"
HKLM,"SYSTEM\CurrentControlSet\Services\usbehci","ImagePath",0x00020000,"system32\DRIVERS\usbehci.sys"
HKLM,"SYSTEM\CurrentControlSet\Services\usbehci","Start",0x00010001,0
HKLM,"SYSTEM\CurrentControlSet\Services\usbehci","Type",0x00010001,1
HKLM,"SYSTEM\CurrentControlSet\Services\usbhub","DisplayName",0x00000000,"USB2 Enabled Hub"
HKLM,"SYSTEM\CurrentControlSet\Services\usbhub","ErrorControl",0x00010001,1
HKLM,"SYSTEM\CurrentControlSet\Services\usbhub","Group",0x00000000,"System Reserved"
HKLM,"SYSTEM\CurrentControlSet\Services\usbhub","ImagePath",0x00020000,"system32\DRIVERS\usbhub.sys"
HKLM,"SYSTEM\CurrentControlSet\Services\usbhub","Start",0x00010001,0
HKLM,"SYSTEM\CurrentControlSet\Services\usbhub","Type",0x00010001,1
HKLM,"SYSTEM\CurrentControlSet\Services\usbuhci","DisplayName",0x00000000,"Microsoft USB Universal Host Controller Miniport Driver"
HKLM,"SYSTEM\CurrentControlSet\Services\usbuhci","ErrorControl",0x00010001,1
HKLM,"SYSTEM\CurrentControlSet\Services\usbuhci","Group",0x00000000,"System Reserved"
HKLM,"SYSTEM\CurrentControlSet\Services\usbuhci","ImagePath",0x00020000,"system32\DRIVERS\usbuhci.sys"
HKLM,"SYSTEM\CurrentControlSet\Services\usbuhci","Start",0x00010001,0
HKLM,"SYSTEM\CurrentControlSet\Services\usbuhci","Type",0x00010001,1
HKLM,"SYSTEM\CurrentControlSet\Services\usbohci","DisplayName",0x00000000,"Microsoft USB Open Host Controller Miniport Driver"
HKLM,"SYSTEM\CurrentControlSet\Services\usbohci","ErrorControl",0x00010001,1
HKLM,"SYSTEM\CurrentControlSet\Services\usbohci","Group",0x00000000,"System Reserved"
HKLM,"SYSTEM\CurrentControlSet\Services\usbohci","ImagePath",0x00020000,"system32\DRIVERS\usbohci.sys"
HKLM,"SYSTEM\CurrentControlSet\Services\usbohci","Start",0x00010001,0
HKLM,"SYSTEM\CurrentControlSet\Services\usbohci","Type",0x00010001,1
7. Repack the inf files into their original IN_ format
If you have not already deleted your extracted .IN_ files, do so now. They need to be replaced. Open a DOS shell again, and navigate to the folder with your changed files. Then exceute the following commands:
cabarc n USB.IN_ usb.inf
cabarc n USBPORT.IN_ usbport.inf
cabarc n USBSTOR.IN_ usbstor.inf
The three IN_ files should now exist again.
Congratulations. All out modifications are done.
8. Inject the changed files into the ISO
Open your Windows CD image again with WinISO. Navigate to the I386 folder, and delete the following files from the ISO, saving the changes to the ISO afterwards:
DOSNET.INF
TXTSETUP.SIF
USB.IN_
USBPORT.IN_
USBSTOR.IN_
Just to be sure all is updated in the ISO, cloase and repoen the ISO in WinISO. Now, again go to the I386 folder and select "Add Files". Now add your changed files, in detail:
USBBOOT.INF
DOSNET.INF
TXTSETUP.SIF
USB.IN_
USBPORT.IN_
USBSTOR.IN_
Save the ISO. You are done.
9. Burn the ISO back to CD
Feel free to use any burning package you want. I used the free and simple Burnatonce
10. Install Windows XP from the CD
Shut down your computer. Disconnect ANY internal and external hard drives (so Windows cannot find them during installation and mess up their Master Boot Records hehe). Some computers will have trouble to boot without an internal HDD attached, check in your BIOS and, if possible, remove the HDD from the boot sequence and set the USB Harddisk as the first boot device, and the CDROM as second.
Also, now connect your USB Harddrive directly to the computer, without any Hubs in between.
Windows should install just fine, with the exceptions noted below.
Issues you will encounter during installation:
During driver installation, the USB drivers will prompt you, as they are "not certified" - This is normal. Our changes invalidated the checksum, and therefore the driver is no longer signed. Just press "yes" a couple of times.
Upon completion of the install, the system will complain once on the first bootup that the pagefile does not exist. You can ignore this for now, as Windows will work fine without it. People are looking at fixing this issue, but its not critical for now.
Once everything is up and running , shut down and reconnect all your drives.
This patch is designed only for all versions of WIndows XP SP3. By increasing the number of TCP/IP connections allowed at one time, your internet speeds up, especially when you are downloading stuff or playing online games.
 I recommend you to set the limitation to 500 to 600. Before applying the patcher, remember to unplug internet connections and restart computer to make sure the TCP/IP file is not in use.
Download this patcher at
Here.
Fast loading web pages while surfing the Internet may have more to do with your web browser settings and preferences than your Internet connection speed.
 Try these easy Firefox tweaks and you’ll see that you’re surfing the Internet from 3 to 30 times faster!
- To get started, open your Firefox web browser. In the address/location bar type about:config and then press your Enter key.
- In the Filter bar type network.http.pipelining. Then, double-click on this line under Preference Name in order to change the value from False to True.
- In the Filter bar type network.http.pipelining.maxrequests. Then, double-click on this line under Preference Name and change the value from 4 to a higher number anywhere from 10 to 30. I set mine to 30.
- In the Filter bar type network.http.proxy.pipelining. Then, double-click on this line under Preference Name in order to change the value from False to True.
- In the Filter bar type network.dns.disableIPv6. Then, double-click on this line under Preference Name in order to change the value from False to True.
- In the Filter bar type plugin.expose_full_path. Then, double-click on this line under Preference Name in order to change the value from False to True.
- In the Filter bar type network.protocol-handler.external.ms-help. Now, you are going to create a new Preference Name with an Integer Value. To do this, right-click on this line under Preference Name and select New, then Integer. In the New Integer value box type in nglayout.initialpaint.delay and click OK. Then in the Enter Integer value box type 0 (that’s a zero) and click OK.
- In the Filter bar again type network.protocol-handler.external.ms-help. Now, you are going to create another new Preference Name with an Integer Value. To do this, right-click on this line under Preference Name and select New, then Integer. In the New Integer value box type in content.notify.backoffcount and click OK. Then in the Enter Integer value box type 5 and click OK.
- In the Filter bar again type network.protocol-handler.external.ms-help. Now, you are going to create another new Preference Name with an Integer Value. To do this, right-click on this line under Preference Name and select New, then Integer. In the New Integer value box type in ui.submenuDelay and click OK. Then in the Enter Integer value box type 0 (that’s a zero) and click OK.
Now, close your web browser and restart it. You’ll see how much faster web pages are loading. I sure did.
Some Malware and Trojan often disable access to Windows Task Manager. Fortunately, a few quick Registry edits are usually all that are needed to regain control.
 Here's how to do it:
- Click Start
- Click Run
- Type REGEDIT
- Click OK and The Registry Editor will now open
- Browse to the following key: HKEY_CURRENT_USER\Software\Microsoft\Windows\CurrentVersion\Policies\system
- In the right pane, look for the value: DisableTaskMgr
- Right click DisableTaskMgr and select Delete. (When prompted with "Are you sure you want to delete this value", select Yes.
- Now browse to the following key: HKEY_LOCAL_MACHINE\SOFTWARE\Microsoft\Windows\CurrentVersion\policies\system
- In the right pane, look for the value: DisableTaskMgr
- Right click DisableTaskMgr and select Delete. (When prompted with "Are you sure you want to delete this value", select Yes.
- Close the Registry by choosing File | Exit
- Restart your computer
You should now be able to access Task Manager. If not, reboot into Safe Mode and repeat the steps outlined above.
This program will transform your Windows user interface to ultimate Windows Vista alike looks that everyone will never notice it’s the same old Windows XP (or 2003).
 Vista Transformation Pack gives to your Windows XP system the fresh and cool look of Microsoft's new operating system: Windows Vista. The pack changes most of the system icons, skins and toolbars and also adds new enhancements to your desktop such as a dock bar or a different system tray clock.
Changes in Version 8.0.1
Fixed pre-configuration specifications to improve performance (Removed unstable applications from list)
Fixed TrueTransparency's stability (some settings in skin causing input hook problems)
Fixed Visualtooltip configuration when user accidently deletes the configuration files in there
Removed backup files' status and put CPU model instead (obsolete checking)
Updated system files' status report to "Out of sync" and repairing system files information
Updated user account configuration system for more subtle performance
Changes in Version 8.0
Added CPU Speed information in Welcome Center
Added saving setup information file to save setup configuration for later uses with unattended transformation support
Added installation background
Added "System optimized" in Setup Configuration to configure the user account corresponding to machine's spec
Added TrueTransparency 0.8.5 (Glass border with ported AeroStyle skin)
Added WinFlip 0.42 (Vista 3DFlip)
Fixed KB925902 hotfix issues with file processing animation
Fixed Media Center program execution error
Fixed rebuilding icon cache bug on non-current users during the processes
Fixed Styler's installation checking bug (always set toolbar to styler mode when possible)
Fixed failing to apply Vista screensaver
Fixed program name in Add/Remove Programs
Fixed subscribing Windows X's shrine to be default homepage bug in Welcome Center
Fixed visualtooltip's advanced configuration bug
Fixed WindowBlinds 6 skin installation compatibility
Moved hotfix warning to user guide file to prevent confusion
Re-arranged welcome dialog for richer information
Replaced Extras in Welcome Center with Community link to forum
Removed configuring user account's status report
Removed obsolete dialogs (WindowBlinds warning, Before transformation, Donation, FAQ and Q&A)
Removed Vista Live Messenger 8.1 skin
Updated Setup Configuration in Welcome Center to cover on everything
Updated setup transformation to pre-configure current user account before finishing the transformation
Updated theming engine configuration
Updated Vista Sidebar to version 2.3 Lite
Updated Vista Sidebar user account configuration in Welcome Center
Updated ViStart to build 2661
Updated ViOrb to version 2.0
Updated VisualTooltip to version 2.2
Updated Welcome Center to pre-configure user account with system optimized option on the first run in that user account
Download this nice software at Here.
Have you ever wondered how to change the default Windows XP logon screen? Now I got the idea to figure out how to make it look like Windows Vista instead, so I'm writing that up for you.
First, you'll have to download and install the free LogonStudio application and make sure that it is set as the default logon handler, which is easy since it will prompt you when you first open it. (Note that this is the same application you can use to customize Windows Vista's logon screen.)
The three default welcome screens aren't very impressive, but there's a ton of great ones on the wincustomize site, including the Vista one you see here.
 Next, download and open the Windows Vista Ultimate Logon screen for XP, and select it in LogonStudio as shown above. Once you hit the Apply button, you'll see your Vista-style logon screen for XP:
 Note that this will not work if you are logging into a domain, or if you use the classic style logon with Ctrl+Alt+Del.
 After re-install or upgrade your XP, you can't access your old My Documents folder? Don't panic, easy..
One have to do is take ownership of that folder where you have been denied access with replace the security permissions to have access.
First, you must be logged on to the computer with an account that has administrative credentials. If you are running Microsoft Windows XP Home Edition, you must start the computer in safe mode, and then log on with an account that has Administrative rights to have access to the Security tab.
If you are using Windows XP Professional, you must disable Simple File Sharing. By default, Windows XP Professional uses Simple File sharing when it is not joined to a domain. For information about how to disable Simple File Sharing, view this Microsoft Knowledge Base's article about it.
Now, follow this steps to take ownership of a folder:
- Right-click the folder that you want to take ownership of, and then click Properties.
- Click the Security tab, and then click OK on the Security message (if one appears).
- Click Advanced, and then click the Owner tab.
- In the Name list, click your user name, or click Administrator if you are logged in as Administrator, or click the Administrators group. If you want to take ownership of the contents of that folder, select the Replace owner on sub containers and objects check box.
- Click OK, and then click Yes when you receive the following message:
- You do not have permission to read the contents of directory folder name. Do you want to replace the directory permissions with permissions granting you Full Control?
- All permissions will be replaced if you press Yes.
- Note folder name is the name of the folder that you want to take ownership of.
- Click OK, and then reapply the permissions and security settings that you want for the folder and its contents.
Hoopla! Now, you're grant access to your old My Documents folder!
 Over time, Windows loses stability. If you keep a computer for more than two years, at some point you're going to have to bite the bullet and reinstall Windows from scratch. But contrary to popular belief, you won't have to reformat your hard drive (with one exception, discussed below). The bad stuff you need to get rid of is all in your Windows folder.
Before you begin, gather your Windows and application CD-ROMs. Back up your data files (just to be safe), and then clear two days off your calendar. If everything goes smoothly, you can reinstall Windows in a few hours. But you have to assume something will go wrong: You may not be able to find a necessary CD, or data won't be where you thought it was, or something will simply refuse to work.
There's a difference between a repair reinstall and a complete reinstall. Though a repair (also called a refresh) will let you keep your current settings, a complete reinstall will give you a truly fresh version of Windows. Repairs are fast and easy, but they don't fix anywhere near as many problems. The instructions below are for total reinstalls, except where noted.
Your Vendor's Restore CD
Most computers ship with a vendor-specific restore CD rather than with a Microsoft Windows CD-ROM. (If your PC came with a Microsoft Windows CD, or if you bought a retail copy of Windows, skip to the section for your version.)
Some restore CDs give you all the options of a full Microsoft Windows CD, but with better instructions and the convenience of having all the right hardware drivers. Others can do nothing except reformat your hard drive and restore it to the condition it was in when you bought the PC. (This case is the exception I mentioned above that requires a reformat.)
If your restore CD is reformat-only, back up your data files to a network or a removable medium before reinstalling Windows. If you use Windows 98 or Me, back up C:\My Documents, plus the folders inside C:\Windows discussed in the 98 section below. If you have Windows 2000 or XP, back up C:\Documents and Settings. Also back up any other folders in which you store your data files.
Windows 98 and ME CDs
These Windows versions keep some important data inside your soon-to-be-erased Windows folder, so you need to copy several of its subfolders to another location. Right-click My Computer and select Explore. Double-click the C: drive icon (in Me, you may then have to click View the entire contents of this drive). Right-click in the right pane and select New, Folder. Name the new folder oldstuff.
Go to the Windows folder (you might have to click View the entire contents of this folder), hold down Ctrl, and select the following subfolders: All Users, Application Data, Desktop, Favorites, Local Settings, Profiles, SendTo, and Start Menu. If you don't see them all, select View, Folder Options (Tools, Folder Options in Me), click the View tab, select Show all files, and click OK. (If you still don't see them all, don't worry about it.) Press Ctrl and drag the folders to C:\oldstuff .
Restart Windows with a start-up disk in your floppy drive. (To make a start-up floppy, insert a disk, select Start, Settings, Control Panel, double-click Add/Remove Programs, click Startup Disk, Create Disk, and follow the prompts.) At the Startup Menu, select Start computer with CD-ROM support. While the drivers load, insert your Windows CD-ROM.
Unless you're doing a repair reinstall, type the command c:\windows\command\deltree /y c:\windows and press Enter. Deleting your old files could take time, but the /y switch suppresses confirmation prompts, so take a break.
When you're back at the A: prompt, type x:setup, where x is your CD drive letter (it's likely one letter past what it usually is in Windows, so if it's D: in Windows, it's probably E: here). Press Enter and follow the prompts.
Once you're back in Windows, reinstall your graphics card driver. If you have Windows set up for more than one user, you'll also have to re-create each account. Select Start, Settings, Control Panel, Users to do so. It's important that the user names match those in the old installation. If you're not sure, open Windows Explorer and navigate to C:\oldstuff\profiles. There you'll find a folder for each registered user name. Don't worry about passwords. Log off and log back on as each user. When you're done, log off and back on one more time, but instead of choosing a user name and a password, press Esc to enter Windows without being a specific user.
Select Start, Programs, MS-DOS Prompt (in Windows 98) or Start, Programs, Accessories, MS-DOS Prompt (in Windows Me). Type xcopy c:\oldstuff\*.* c:\windows /s /h /r /c and press Enter (if you want to know what the xcopy switches do, enter the command xcopy /?). When xcopy asks if it should overwrite a file, press a for All.
When xcopy is through, reboot and log on (as a particular user, if necessary). Open My Documents to make sure all your personal files are where they belong, including your Internet Explorer favorites and your custom Start menu shortcuts.
Now skip ahead to "Finishing the Job."
Windows 2000 and XP CDs
Boot your computer with your Windows CD-ROM inserted. When you get the 'Press any key to boot from CD' message, do so. (If you don't see that message before Windows starts, restart Windows, press the key you're prompted to enter for your PC Setup program, and change the boot order so your CD drive is first.)
At the 'Welcome to Setup' screen, press Enter. The R (repair) option takes you to the Recovery Module, which is useful if Windows won't boot, but it's no help with a reinstallation. Soon you'll be told that there's already a Windows installation on the computer. Press r for a repair reinstall or Esc to begin a complete, destructive one. For a complete restore, select your C: partition and press Enter. When you get the warning that says an operating system is on that partition, press c. When you are asked your partition preference, select Leave the current file system intact (no changes). When you're told that a Windows folder (or Winnt folder for Windows 2000) already exists, press l ('ell') to delete it and create a new one. Follow the series of prompts. When the installation program asks for your name, enter temp.
Once the installation is complete, your system will reboot into Windows, and you'll be logged on as user Temp. If the screen is difficult to read, reinstall your graphics card driver.
If you are reinstalling Windows XP, skip to "For Both Windows XP and 2000."
If you're reinstalling Windows 2000, log off as Temp and back on as Administrator. Now log off and on again, this time as Temp. Open Windows Explorer and navigate to C:\Documents and Settings. One of the subfolders will be named Administrator. Another will be named something like Administrator.computername.
Select Start, Programs, Accessories, Command Prompt. Type cd "\documents and settings" and press Enter. Then type xcopy administrator\*.* administrator.computername /s /h /r /c, replacing computername with the last part of that folder's name (after "Administrator.") in Documents and Settings. Now press Enter, and when you're asked about overwriting files or folders, press a for All.
If you have any users on the old installation besides Administrator, continue with the "For Both Windows XP and 2000" section. Otherwise, open Windows Explorer and make sure your data files are where they belong. Then go to Control Panel's Users and Passwords applet and delete the user Temp before skipping to "Finishing the Job."
For Both Windows XP and 2000
Reopen Windows Explorer. Select your C: drive (you may have to click Show the contents of this folder). Right-click in the right pane and select New, Folder. Name the new folder oldstuff. In the left pane, choose the Documents and Settings folder. It should have subfolders for each user from the previous install, plus one for Temp and a few others. Move the folders for your previous user names to oldstuff.
Select Start, Control Panel, User Accounts (Start, Settings, Control Panel, Users and Passwords in Windows 2000). Create an account for each user who was registered before the reinstall. Be sure to use the exact names. They are the same names as the folders you just moved to oldstuff. In Windows XP, at least one user must have administrator privileges.
Log off and back on as each user, before logging back on as Temp. Make sure that you select Log Off and not Switch User at Windows XP's Log Off dialog box (this isn't an issue in Windows2000).
Log on as Temp, select Start, Programs, Accessories, Command Prompt (in XP, Start, All Programs, Accessories, Command Prompt), type xcopy c:\oldstuff\*.* "c:\documents and settings" /s /h /r /c, and press Enter. Press a when asked if you want to overwrite a file. Log off Temp and log on to each restored account to make sure everyone's documents and data are where they belong. Log on as an administrator and run Control Panel's User Accounts applet again to remove the user Temp.
Finishing the Job
Now you've got Windows going, but not much else. You may have to reinstall your printer, sound card, and so on. Luckily, if a driver for the gadget came on your Windows or vendor restore CD, it was probably reinstalled automatically.
You'll have to reinstall your applications to reintroduce them to Windows. Some of their settings will not be changed by the re-installation, but those that were stored in the Registry were wiped out.
Once your Internet connection is running again, browse to Windows Update and download all critical updates for your version. Then visit the sites of your hardware vendors to update your drivers.
After the reinstall, some of your data may not show up where it should. Search for it in both your Application Data and oldstuff folders, and see if you can move it to the folder in which Windows or your apps are looking for it. If you find a folder called Identities with two subfolders whose names are long and indecipherable, try moving the contents of one to the other and see if your data reappears.
You've probably guessed that the final step is deleting the c:\oldstuff folder--and the Administrator folder in Windows 2000. Make this the very last step, however. Wait a couple of days, weeks, or even months until you're confident that all of your needed files are accessible.
Here is Another Possible Solution: easy way and tested:
- Start WindowsXP
- Go to the location of your Windows CD Setup source files
- Run WINNT32 /unattend
For example, D:\I386\winnt32 /unattend ( copy & paste this command into the RUN box, then press ENTER ) Your computer will do the rest.
Or,
Start > All Programs > Accessories > Command Prompt.
Copy & paste > D:\I386\winnt32 /unattend
Press Enter.
If you have i386 on your drive, you can replace D: ( if D: is your cd drive ) with the location of it.
I've often need to do this to repair something that had gotten corrupted and didn't want to do a clean install.
Notes:
D: is the driver letter where your windows XP Cd is
if D:\I386\winnt32 /unattend doesn't work then try : d:\winnt32 /unattend.
 This tweak reduces the time Windows XP waits before automatically closing any running programs when you give it the command to shutdown.
Go to Start then select Run
Type 'Regedit' and click OK
Find 'HKEY_CURRENT_USER\Control Panel\Desktop\'
Select 'WaitToKillAppTimeout'
Right click and select 'Modify'
Change the value to '1000'
Click 'OK'
Now select 'HungAppTimeout'
Right click and select 'Modify'
Change the value to '1000'
Click 'OK'
Now find 'HKEY_USERS\.DEFAULT\Control Panel\Desktop'
Select 'WaitToKillAppTimeout'
Right click and select 'Modify'
Change the value to '1000'
Click 'OK'
Now find 'HKEY_LOCAL_MACHINE\System\Cur rentControlSet\Control\'
Select 'WaitToKillServiceTimeout'
Right click and select 'Modify'
Change the value to '1000'
Click 'OK'
That's all and Enjoy your XP Shutdown Speed now!
 Windows XP has a performance monitor utility which monitors several areas of your PC's performance. These utilities take up system resources so disabling is a good idea.
Follow this step to disable it:
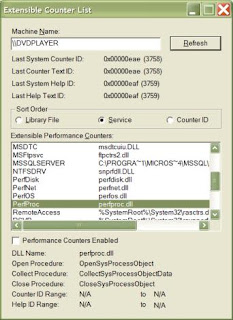
1. Download and install the Extensible Performance Counter List.
2.Then select each counter in turn in the 'Extensible performance counters' window and clear the 'performance counters enabled' checkbox at the bottom.button below.
3. Reboot your PC.
4. Done. Your XP runs more faster.
If you are using a dual boot system with Ubuntu and Windows, you can clearly notice the limitations Linux has. And for many (myself included), Linux is extremely difficult. After awhile I came to the conclusion that I didn’t need ubuntu at all, but I still loved to look and feeling, after searching for ways to make my windows computer have that gnome feeling this is what I found:
 Start with the visual style, if you haven’t already install Uxtheme Multipatcher, this will remove the limitations on your system, in order to install new themes. Then download the Human Visual Style Ubuntu Linux.
 Go to C:\Windows\Resources\Themes and safe your download theme in there.
Now right click on your Desktop and click on Properties. Go to Appearance and select Human as the theme.
Now change the icons, first install Icontweaker,after that install Ubuntu Icontweaker theme.
Next, change the wallpaper on your desktop, get the Ubuntu wallpaper Here or Here.
To replace the icons for Windows Explorer, first install Styler toolbar(free), get the Ubuntu Human Theme for Styler.
 Now get the famous Ubuntu Cursor
 Now, what everybody wants. The alternative to Beryl on Linux. Get it Here, and get that “3D CUBE” effect.
 To change the boot screen download BootSkin (it’s free): Get it Here.
And download the Ubuntu Bootskin:
 To get Ubuntu Logon screen
 go here.
For Mozilla Firefox Web Browser, you can install the Ubuntu Theme, for Thunderbird or Dapper Retouched for Opera.
Source: The Indie Tribune
Windows XP SP2 introduces a few new twists to TCP/IP in order to babysit users and "reduce the threat" of worms spreading fast without control. In one such attempt, the devs seem to have limited the number of possible TCP connection attempts per second to 10 (from unlimited in SP1). This argumentative feature can possibly affect server and P2P programs that need to open many outbound connections at the same time.
Rant: The forward thinking of Microsoft developers here is that you can only infect 10 new systems per second via TCP/IP ?!?... If you also consider that each of those infected computers will infect 10 others at the same rate:
second 1: 1+10 computers
second 2: 10+10*10 computers (110 new ones)
second 3: 10+100*10 computers ( 1110 new ones)
second 4: 10+1000*10 computers (11110 new ones)
....
all the way to 10*60 + 10^60 computers in a single minute (that's a number with 60 digits, or it would far exceed Earth's population). Even if we consider that 90% of those computers are unreachable/protected, one would still reach ALL of them within a minute.
In other words, even though it is not going to stop worm spreading, it's going to delay it a few seconds, limit possible network congestion a bit, and limit the use of your PC to 10 connection attempts per second in the process ! I have no problem with the new default setting limiting outbound connection attempts.
Still, users should have the option to easily disable or change this setting. I might be going out on a limb here, but ever since the introduction of Windows XP I can't help thinking that I dislike all the bult-in Windows "wisardry" in a sense that the system also limits user access. That irritating trend to ease the mental load on end users is somewhat insulting, considering that Windows is to make the more "intelligent" choice instead of the end user, as well as limit their access to tuning such settings...
End of rant.
With the new implementation, if a P2P or some other network program attempts to connect to 100 sites at once, it would only be able to connect to 10 per second, so it would take it 10 seconds to reach all 100. In addition, even though the setting was registry editable in XP SP1, it is now only possible to edit by changing it directly in the system file tcpip.sys. To make matters worse, that file is in use, so you also need to be in Safe mode in order to edit it.
You only need to worry about the number of connection attempts per second if you have noticed a slowdown in network programs requiring a number of connections opened at once. You can check if you're hitting this limit from the Event Viewer, under System - look for TCP/IP Warnings saying: "TCP/IP has reached the security limit imposed on the number of concurrent TCP connect attempts". Keep in mind this is a cap only on incomplete outbound connect attempts per second, not total connections. Still, running servers and P2P programs can definitely be affected by this new limitation. Use the fix as you see fit.
To change or remove the limit, you can use the following program.
- A patching program for removing or changing the limit imposed on connection attempts in SP2. The patcher has the ability to restore tcpip.sys back to the original... Still, you might want to back up tcpip.sys, use it at your own risk.
The author of this patch can be reached at the site.
Whenever you start your computer, you are faced with a few moments of thumb twiddling while Windows XP boots and prompts you to log on. Although you should expect to wait for a few moments, sometimes Windows XP seems to boot rather slowly. In fact, you may notice that over a period of time the PC that used to roar to life seems a bit sluggish instead. Fortunately, you can perform several techniques that help Windows XP get the bootup speed you want. This chapter explores how to put these techniques to work.
Stopping Unneeded Startup Services
Along with the core operating system and programs that Windows XP runs when it starts, there is also a host of services involved. Many of these services are necessary for Windows XP to operate correctly. However, many of them are for features in Windows XP that you may not use at all. You can peruse the services and disable any service that you do not want to run. The fewer services that run, the more quickly Windows XP will boot.
Caution:
Exercise caution when stopping services. If you do not know what a service does or are unsure of the ramifications of stopping the service, leave it alone. Some services are critical to Windows XP's operations, so make sure you understand what the service is before you disable it.
To reduce the number of services that start on bootup, you can access two different areas of Windows XP. The first is the System Configuration Utility. The Services tab shows you the services that start when the computer boots.
You can stop a service from starting by simply clearing the check box next to the service and clicking OK. However, before you do so, there is another way to disable services that you may prefer because the interface gives you more information about the service in question.
Open Control Panel/Administrative ToolsServices or else select Start/Run, type services.msc, and click OK. Either way, you see the Services console.
I prefer to use the Services console instead of the System Configuration Utility because it describes what the service does. Additionally, you can double-click a service and examine its properties.
Notice the Startup Type column. This information lists whether the service is automatic or manual. Manual services are only started in Windows XP when you start a process that requires the service. Some other process may require the service that has a "dependency" relationship with it; in this case, the dependency service will start, as well. Because these services do not start automatically when you boot Windows XP, you do not need to do anything with manual services.
However, all services listed as automatic start when Windows XP boots. These are the services that increase boot time. As I have mentioned, many of them are necessary and important, so you should not stop automatic services from booting unless you are sure of the ramifications. You can get this information by looking at the Description column. Here's a quick look at common services you may want to live without:
Automatic Updates: This service enables Windows XP to check the Web automatically for updates. If you don't want to use Automatic Updates, you can disable the service. You can always check for updates manually at the Windows Update Web site.
Computer Browser: If your computer is not on a network, you don't need this service. If you are on a network, leave it alone.
DHCP Client: If you are not on a network, you do not need this service. If you are on a small workgroup, you can still increase boot time by configuring manual IP addresses (which I explore later in this chapter).
DNS Client: If you are not on a network, you do not need this service. If you are, leave it alone.
Error Reporting and Event Log: You don't have to use these services but they can be very helpful, so I would leave them configured as automatic.
Fax: If you don't use your computer for fax services, you can disable this one.
Help and Support: If you never use the Windows XP Help and Support Center (found on the Start menu), you can disable this service.
IMAPI CD-Burning COM: This service enables you to burn CDs on your computer. If you never burn CDs, you can disable the service.
Indexing Service: Your computer keeps an index of files but if you rarely search for files, the service is just a resource hog. You can stop it and turn the service to manual.
Windows Firewall/Internet Connection Sharing: If you do not use these features, you can disable them.
Infrared Monitor: If you do not use infrared devices, you can disable this service.
Messenger: This service sends alert messages on a local area network (it is not the same as Windows Messenger). If you are not on a network, you can disable this service.
Print Spooler: If you do not do any printing from the computer, you can disable this service. If you print, make sure you leave it as automatic.
Remote Registry: This service allows remote users to modify the Registry on your computer. If you are not on a network, you can disable this service.
System Restore Service: This service allows you to use System Restore. If you have turned off System Restore anyway, you do not need to turn off the service. If you do, you turn off System Restore.
Themes: If you do not use themes, you can disable this service.
Windows Image Acquisition: If you do not use scanners or digital cameras, you can disable this service.
Wireless Zero Configuration: If do not use wireless networking devices, you can disable this service.
You may have a number of other automatic services, depending on software and other configurations on your computer. So it's a good idea to look through the services and learn more about them. If you double-click a service, a Properties dialog box appears
Notice that on the General tab, you see a Startup Type drop-down menu. If you want to change an automatic service to manual, select Manual here and click OK. As a general rule, don't disable a service unless you are sure you will never use it. However, manual configuration allows the service to be started when you find it necessary, thus speeding up your boot time.
However, before you change a service to manual, look at the Dependencies tab. This tab shows you which other services depend upon the service you are considering changing.
Keep in mind that services are necessary for the vast functionality you get with Windows XP. Change only those services that you understand and do not use. How you use your Windows XP computer should be the best guide in terms of optional startup services.
Tip:
The Indexing service and the System Restore service take up a lot of disk space and system resources across the board. You can live without the Indexing service but I suggest that you keep using System Restore. It works great when you are in a bind and this is one case where the loss of speed may not be worth the ramifications of not using System Restore.
 Here the trick how to lock your folders without any software:
- Open Notepad and copy the below code
- Change your password in the code it's shown the place where to type your password.
- Save file as locker.bat
- Now double click on locker.bat
- It will create folder with Locker automatically for u. After creation of the Locker folder, place the contents u want to lock inside the Locker Folder and run locker.bat again.
Locker.bat
cls
@echo off
color 9f
title Folder Locker
:option
echo 1.Create folder 2.Lock folder 3.Unlock folder 4.Set password
set/p "option=Please choose option 1-4>"
if %option%==1 goto create
if %option%==2 goto lock
if %option%==3 goto unlock
if %option%==4 goto set
echo Invalid choice
goto option
:create
if exist "Control Panel.{21EC2020-3AEA-1069-A2DD-08002B30309D}" (echo You already have a locked folder & goto option)
if not exist "Locker" (md Locker & echo Locker created successfully ) Else (echo Locker folder already exist)
if defined mypass (goto option)
echo This is the first time you run this program please enter a
echo password and log off this user and logon again for the
echo password to take effect.
set /p "long=Set your password>"
reg add "hklm\system\currentcontrolset\control\session manager\environment" /v mypass /d %long% /f
cls
echo Password set successfully
goto option
:lock
if exist "Control Panel.{21EC2020-3AEA-1069-A2DD-08002B30309D}" (echo Folder already locked & goto option)
if not exist "Locker" (echo You need to create a folder first & goto Option)
ren Locker "Control Panel.{21EC2020-3AEA-1069-A2DD-08002B30309D}"
attrib +h +s "Control Panel.{21EC2020-3AEA-1069-A2DD-08002B30309D}"
echo Folder Locked Successfully
goto option
:unlock
set x=1
set /a y=y + x
if %y% GTR 3 goto wait
if exist "Locker" (echo No file to unlock & goto option)
if not exist "Control Panel.{21EC2020-3AEA-1069-A2DD-08002B30309D}" (echo No file to unlock & goto option)
if not defined mypass (echo You need to set a password & goto option)
set/p "pass=Enter password to unlock folder>"
if not %pass%==%mypass% (echo Invalid password & goto unlock)
attrib -h -s "Control Panel.{21EC2020-3AEA-1069-A2DD-08002B30309D}"
ren "Control Panel.{21EC2020-3AEA-1069-A2DD-08002B30309D}" Locker
echo Folder unlocked successfully
goto option
:set
echo 1.Change password 2.Remove password
set /p "short=Please choose option 1-2>"
if %short%==1 goto reset
if %short%==2 goto remove
:reset
echo You have select to change your password if you do not wish
echo to continue please close the command prompt else enter the
echo old password to continue.
set /p "longer=Enter old password>"
if not %longer%==%mypass% (echo Invalid password & goto set)
set /p "longest=Enter new password>"
reg add "hklm\system\currentcontrolset\control\session manager\environment" /v mypass /d %longest% /f
cls
echo Please log off and login again for password to take effect
goto option
:remove
if exist "Control Panel.{21EC2020-3AEA-1069-A2DD-08002B30309D}" (echo Please unlock folder before proceed to remove password & goto option)
echo You have select to remove your password if you do not wish
echo to continue please close the command prompt else enter the
echo old password.
set /p "longer=Enter old password>"
if not %longer%==%mypass% (echo Invalid password & goto remove)
reg delete "hklm\system\currentcontrolset\control\session manager\environment" /v mypass /f
cls
echo Password remove successfully
echo Please log off and login again for password to fully erased from memory
goto option
:wait
cls
echo You have enter an invalid password 3 times in a row please
echo try again.
goto option
Here is the steps for change your cable IP:
Create a new batch file.
Then write in it:
ipconfig /release
netsh int ip set address name="name of connection" source=static 111.111.111.111 255.255.255.0
netsh int ip set address name="name of connection" source=dhcp
Save it with the extension .bat
Just run and enjoy it !
 When you click on the SHUTDOWN button, make sure to simultaneous press SHIFT Button. If you hold the Shift key down while clicking on SHUTDOWN button, you computer would restart without restarting the Computer. This is equivalent to term "HOT REBOOT".Make sure you are using fast switching for user. For those who don't know here is the method :
Goto Control Panel
Double click user account
Click on change the way user log and log off, there you will make the changes by marking the two boxes.
 Using ControlFreak we can use our mobile as mouse for PC. This freeware application is a plugin for winamp. So to use this application winamp must be installed in PC. Then install it and press ctrl+F7 and type the port COM7 in the dialog box. It will create one 'sis' file. Install it in mobile and open it. Now u can use your mobile as mouse. Using this you can operate winamp as well as you desktop.
Download ControlFreak at here or here.
Requirements
- A Series 60 1st or 2nd edition based smart phone (3rd edition not supported)
- A computer with Windows 2000 or Windows XP
- Bluetooth adapter which supports the Bluetooth Serial Port Profile
- Winamp 2 or 5
Installation
Run the installer and select your Winamp plugins directory and a location to copy the phone application.
When the installer is complete it will launch Winamp and the plugin will try to configure itself automatically. If you are using Microsoft Bluetooth drivers or the Widcomm stack, no manual changes should be needed. If you are using some other driver or are having trouble with the automatic settings, see the Bluetooth setup section below.
Send the ControlFreak.sis file to your phone using the "Send To" right click menu option in Explorer, or use the software provided by your Bluetooth adapter. You can install the application to either phone memory or MMC.
After installation on the phone a new item will appear in the application menu titled "CtrlFreak".
Bluetooth Setup
If you are using Windows XP with SP2 or higher and have a supported Bluetooth
device, setup is quite easy.
Open "Bluetooth Devices" in the Control Panel.
Pair your phone and computer using the "Add Bluetooth Device Wizard".
Open the ControlFreak plugin configuration dialog found in Winamp's preferences
Plug-ins -> General Purpose -> ControlFreak Plug-In (or use shortcut key Ctrl-F in Winamp's main window)
Select "Microsoft" as the Bluetooth driver.
Click "Start server".
Note: If for some reason you have trouble connecting using the Microsoft
Bluetooth driver, you could also try the instructions below.
If you are using a Bluetooth device that requires installed drivers, you should select "Installed other" as the Bluetooth driver. You then need to set the Bluetooth virtual serial port (also called a COM port) which the plugin will use to communicate to the phone application. This is usually pretty easy but it varies depending on your Bluetooth software. An important thing to remember is that your computer uses separate COM ports for incoming and outgoing connections. You need to check your Bluetooth software and be sure to use the incoming COM port.
Here are some step-by-step examples for finding the right COM Port and adjusting the security settings if necessary (your device might have different software but probably has similar settings).
Windows XP SP2 compatible device:
Open "Bluetooth Devices" in the Control Panel.
Pair your phone and computer using the "Add Bluetooth Device Wizard".
Select "COM Ports" tab
Note the Incoming port number for your phone. If no incoming port is listed you need to add it using the "Add..." button.
Widcomm Bluetooth (eg. IBM T40 laptop):
Open "My Bluetooth Places".
Right click "My Device" and select "Properties".
Under "Local Services", set existing Bluetooth Serial Port service to unsecure connection, or click Add Serial Service if it doesn't exist (check Startup Automatically, uncheck Secure Connection). Note the COM port number.
3Com USB Bluetooth adapter:
Open "Bluetooth Connection Manager".
Choose the "Tools\COM Ports" menu item.
Note the 3Com Bluetooth Serial Host port number. (not the 3Com Bluetooth Serial Client)
Tip: You can disable being prompted to allow connections by going to Tools\Security Mode, selecting "Custom" and then setting "Security Level" to "None".
Now that you know the incoming COM port, open the configuration window of the ControlFreak Winamp plug-in:
- Enter the COM port into the combo box (if your incoming Bluetooth Serial port is COM8, you can type "8" or "COM8" into the COM Port field).
- Click "Start server".
Tip: You can click "Search" to find all existing COM ports if you are not sure what are available. With certain configurations this could take a couple minutes and cause prompting to create Bluetooth connections. Just cancel any connection requests.
Plugin Configuration
Press Ctrl-F in Winamp to open the ControlFreak configuration window.
You can configure the following settings:
Connection
Startup with Winamp: If checked, the server will be started whenever Winamp starts. Recommended once successful connection has been made.
Spectrum Analyser
Latency (ms): The latency between sending data and it arriving on the phone.
This determines synchronisation of the spectrum data. You can set this to
"Auto detect" and let ControlFreak automatically adjust the latency.
Buffer spectrum data: Whether spectrum data should be collected in a buffer
before sending it to the phone. Unless you experience frame loss due to
variable latency of your Bluetooth adapter or high CPU load (like when
watching movies), you should leave this enabled.
Keymaps
Opens the customised keymap file for editing. Here you can set what keyboard
shortcuts are mapped to the phone keys for specific applications.
Visit to developer site for more info and to make sure you get the most out of ControlFreak.