Showing posts with label hardware. Show all posts

Tuesday, April 20, 2010

Choice LCD Wall Mounts: Fixed or Variable type?

Flat screen LCD's have the perfect shape for putting it up on the wall, this preserves space and can be viewed as a peice of art when above the mantle or with other pieces of art. The mounts for LCDs have several types that will be discussed in this article. They can be either fixed or variable, of course as the name implies the fixed mount doesn't move. A fixed mount is a very sleek look since the television is only an inch from the wall, but this is best used where the seating in the viewing room is a fixed place.
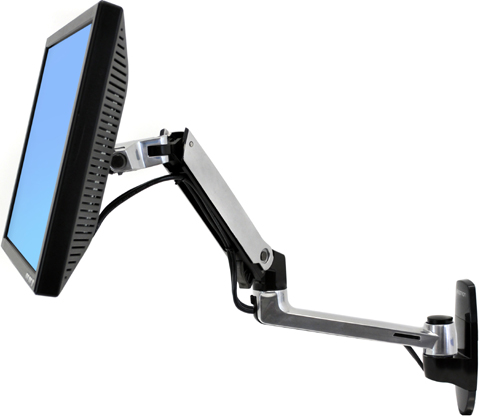

The variable type wall mount is best is someone wants to be able to adjust the television. For just slight movement a tilt wall mount will work, it will permit some movement perfect for a case where there is a light glare issue, or if there are children watching, it can be tilted toward the floor. This tilt wall mount can be hand adjusted or with a tool, this one will cost a little more than the fixed mount.


For full motion you may want to look into a type of variable wall mount that has arms, which allow you to move the television up and down, back and forth along with left and right. Amazingly a number of these types of mounts come with a remote control that allows the television to be moved from where you sit, a huge convenience. In addition, there are ceiling mounts which offer a unique look, in case there's not a way to mount it on the wall.

There are pros and cons for every wall mount available. A fixed mount will not have adjustability but it will carry a greater weight. The further the TV gets from the wall the less steady it becomes, as even the smaller LCDs are around fifty pounds. A heavier, bigger television will have to have a much sturdier wall mount, and this will drive up the cost, especially if it's adjustable.

Research and shop carefully for your wall mount as they are not all the same, it must be appropriate for the size and weight of your LCD. There are matching wall mounts available from the manufacturers but these often cost more than those built by a third party company. Investigate all aspects of the wall mount including looking at the room where it's going to be mounted to make sure it's the right one. If you make a good decision about what type and where to put it, then your viewing experience is going to be enhanced.

Wednesday, October 22, 2008

How To Change Your Motherboard Battery

First the safety rules!

The inside of a computer is a bad place full of electricity and sharp edges.
On the electricity side always when working on you computer make sure that it’s still plugged in to the power socket and the power is turned off, this is to ensure that any static
From you is discharged through the earth. The inside of most computer cases are unfinished metal and has very sharp edges so be careful.

The first signs of a battery failing are:

  • Your clock starts running slowly
  • When you boot (start) your computer it has a problem finding your hardware (no hard drive, no cd rom)

To change the battery you need the following tools:

  • a X-point screwdriver
  • an anti-static strap(optional)
  • a new battery (seems logical)

Then unplug all the cables from the back of the computer as you remove them make a note where they came from. (So when you finished you can put them back).

Move the computer somewhere where you can work on it with ease
Remove the cover by locating the screws around the outer edge (back) of the computer
Some computer cases only require you to remove 2 screws on one side then a panel can be removed allowing you access to the computers insides, others you must remove 6 screws and remove the whole case by sliding it to the rear and lifting it off.


Now make sure that you read the safety instructions about static.
Look inside you will see a round silver thing that looks about the size of a 10p piece (quarter). This is the battery itself, carefully lift the retaining clip and slide the battery out. That’s it removed now go to your local computer retailer, electrical retailer (Tandy/Radio shack) taking the old battery with you and get a new battery.
Back to your computer insert the new battery by lifting the clip and sliding the battery in.


Reinstall your case and plug all the cables back (you did remember to label them didn’t you)
Turn on your PC. You will now need to go into you bios….
Right the bios is the god of your computer. To access it, when your computer first starts you will see a black screen with white text.
If you look carefully you will see a line that says something like "press del for setup" or some other key (F2 or ESC or tab) this will take you to god's house where you can make lots of changes to the way your machine works.


It is also the place where you can make your nice computer in to a rather expensive door stop so be careful and don’t go playing with anything.
You will now be presented with a blue screen with a lot of options on it, the one we want is Load Optimised / Default settings.
Press the F10 key for save setting and type Y, the computer should now reboot.
If every thing went well then your computer will now be up and running.

Extreme way (NOT RECOMMENDED):

  • Keep computer running.
  • Lay it on it's side and remove side cover to expose Motherboard.
  • Take any thin object, "small screwdriver, knife point, wood shiskabob skewer.
  • Pull back the battery retaining clip.
  • Toss the old battery in the junk receptacle, unless you belong to Greenpeace and want to save the earth.
  • Install the new battery. No need to reset bios becasue the compter supplies voltage to the CMOS while it is running.
  • Reset or resync clock with internet. Done!


Sunday, August 24, 2008

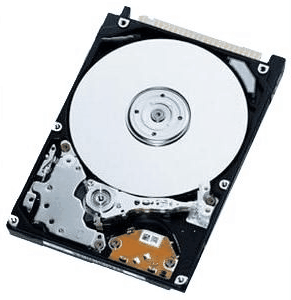
Know More Your Laptop Hard Drives

If you own a laptop, it might be useful for you to learn about the hard drive in the machine. The reason is that many hard drives might need to be upgraded for increased speed or capacity, or they might fail at some point.


We will explore 5 things you need to know about laptop hard drives so that you can upgrade or replace your hard drive if there is ever a need. Remember, laptop hard drives are more expensive than desktop units so you need to consider carefully before purchasing one.

Small Physical Size
Laptop hard drives are obviously smaller than their desktop counterparts. This is needed for mobility and you usually find laptop hard drives of thicknesses around 10 to 12 mm. That is extremely thin and suits lightweight and portable laptop models.
The smaller size reduces the capacity of laptop hard drives as well (see Point 3 below).

Lower Disk Speeds
Now, how does laptop hard drive speed measure up? Well, compared to their desktop and enterprise counterparts, laptop hard drives tend to be slower. You will usually find that a mobile hard drive spins at 5,400 rpm (although others spin with 7,200 rpm).

Hard Drive Capacity
Typical laptop hard drive capacities these days come at 100 to 200 GB. That's a lot of storage space compared to the days when you could only squeeze maybe 20 GB in laptop hard drive. Interestingly, Samsung has just released a 500 GB hard disk drive for laptops. That is amazing storage that you usually only get in desktops. Things are clearly progressing in the laptop world.

Solid State Drives
An important trend in laptop hard drives is the increasing use of solid state drives. What is a solid state drive? Well, a solid state storage device is like the thing that stores the music in your iPod nano or pen drive. It has no moving parts like a traditional hard drive, and is hence not subjected to damage due to jumps and shocks. Technology has progressed to the point where solid state drives are increasingly more popular and also more affordable. Some examples of laptops with solid state technology options are the Apple MacBook Air, the ASUS Eee PC and the Toshiba Portege R500.

Shock-Resistant Technology
One of the more recent innovations in laptop hard drives is that of shock-resistant technology. If you own an Lenovo ThinkPad, you will notice that there is an icon on the lower right corner of your screen that changes when you suddenly move the laptop.

Now, there's an accelerometer inside the laptop which monitors any sudden changes in motion. If the laptop detects it, it will instantly park the heads on the hard disk to prevent them from corrupting data. Ingenious idea, huh?

Thursday, April 10, 2008

Our Future Laptop in 2015

"Between now and 2015, we expect to see a series of big changes that will redefine what a notebook is and what it looks like," said Mike Trainor, Intel Corp.'s evangelist for mobile products.With crystal ball in hand, we talked to designers, engineers and marketers about how notebooks are likely to change over the next seven years.

Concepts for the future

First, let's take a look at some concept notebooks. Just as futuristic show cars give us insight into what we might be driving in the future, concept notebooks offer a sneak peek at how we'll be computing.

These concept notebooks typically are created by independent designers and firms retained by laptop vendors. This is highly secretive business -- the designers we spoke were willing to talk about some of their concepts but couldn't tell us who they were working for.

Rarely does a concept notebook make it to the real world as a whole unit, but certain aspects often make it into production. Early 1990s concept devices contained integrated pointing devices, speakers and webcams, all of which are now standard equipment. It's likely that at least some of the new ideas, components and features showcased below will be coming to a notebook near you.

For example, several concept laptops rely on touch-sensitive screens that act as the system's keyboard and mouse and go beyond today's multi-touch technology. Imagine being able to slide your finger across the screen to immediately shut off the display and keep what you're working on confidential, and you get an idea of its potential.


Compenion

The Compenion concept notebook from independent designer Felix Schmidberger in Stuttgart, Germany, borrows heavily from slider cell phones to move beyond the clamshell. Rather than lifting the lid open, just slide it up.

Compenion

The pair of superbright organic LED panels slide into place next to each other, with the lower panel acting as keyboard or scribble pad. The whole thing is only three-quarters of an inch thick.

"It reduces thickness, but the slider was more about the feel of using the notebook," said Schmidberger. "The idea is to break free from traditional notebook hardware without having to adapt to new ways of using a computer."

Together, the 11-in. screens will yield about 16 inches of usable workspace, so the system has the dimensions and weight of a thin and light system but the screen of a larger one.


Canova

Dual-screen systems could well be the rage in seven years. The Canova from V12 Design, a Milan, Italy-based design firm, is closer to the tried and true clamshell layout, but with a twist.

Canova Dual Screen

Instead of a display and a mechanical keyboard, the device has two touch-sensitive displays: The upper screen is primarily for viewing applications, and the lower screen is for the mundane activities of typing, drawing and jotting notes. But the Canova can also lie flat for a large expanse of working space.

According to designer Valero Cometti, "the idea was to close the gap between man and machine." This notebook changes personality depending on how it's held. Opened all the way, it's a sketch pad. Fold it half open and rotate it 90 degrees, and it's an e-book. By emulating a musical keyboard on the lower half, when it's flat on a table, it can be a go-anywhere piano.


Siafu

Who needs a screen at all? Long Beach, Calif.-based independent designer Jonathan Lucas' eccentric Siafu concept can touch you, literally. That's because Siafu is for the blind and has no screen.

"The idea was to open a new realm of digital interface for the visually impaired by enhancing and even surpassing existing technologies that currently cater to this group," said Lucas.

Siafu Computer
Because the blind can't see what's on the screen, Siafu converts images into corresponding 3-D shapes that are created with Magneclay, an oil-based synthetic material that instantly forms shapes in response to electrical fields.

In such hands-on computing, you interact with Siafu with your fingers to feel the bumps and protrusions that pop up. The Magneclay surface could be used for reading a Braille newspaper, feeling the shape of someone's face or going over a tactile representation of a blueprint.


Cario

Imagine a system that is at home in a car, in an Internet café or on a hotel desk, and you have the job description of Anna Lopez' Cario.
"The concept offers several ways of working on the move or at a desk," explained U.K.-based independent designer Lopez.
Equal parts form, function and fashion, this concept replaces the traditional lid hinge with a shiny bar that -- as the name implies -- is a carrying handle. It also allows the lid to fold up for travel and can be converted into a an easel or sit on a car's steering wheel.

Cario, Car Laptop
Not surprisingly, then, Cario comes into its own on the road. So the driver doesn't get cross-eyed or crook-necked by looking down at the screen when it's locked into the steering wheel, Cario has a microprojector that projects its images onto the vehicle's windshield. This heads-up display can show maps, videoconferences and find the closest gas station.


Changing materials

Some changes and new functionality in the laptops we'll use in 2015 will come about because of significant advances in the materials used to create the devices. Magneclay is just one example.

Another example is a change in the plastics used in the notebook case. In fact, by 2015, dropping a notebook might not be the catastrophe it can be today.

That's because a group at UCLA's Exotic Materials Institute led by Fred Wudl has come up with an epoxy that's strong, durable and can repair itself. Called Automend, small cracks can be sealed by just heating the surface with a hair dryer, making it a godsend for the clumsy among us.

Another example relates to peripherals used on the road. For instance, future mobile systems could easily include projectors, which will be reduced to about the size of a pack of cigarettes by 2015.
Because such projectors use a laser, "you can project images on a wall within a distance of several meters without having to adjust a lens," said Schmidberger. "It can even be bumpy or bent."


Powerful components

It doesn't take a very clear crystal ball to know that the next generation of notebooks will deliver much more computing power. And notebooks will also get smarter as components continue to shrink and more components get squeezed onto a sliver of silicon the size of a fingernail.

The result will be that notebooks will be able to perform tasks that we can only dream of today. Here's what our experts say those components will look like and what they'll be able to do.


Processors

It's a sure bet that we won't be using a mere single- or double-core processor by 2015. Most notebooks will have at least six computational cores, if not eight, according to the experts we contacted.

Such technology is available today, so it surely will be standard-issue on laptops of the future, the experts agreed. Having at least six computational cores at your disposal will not only make high-end simulations and data visualizations possible, but will also make for one heck of a game of Halo.
Missing your bus

The CPU's front-side bus will likely disappear by 2015. The bus acts like a traffic cop, sending data to the different parts of the system at a slower speed than the computational core. In its place will be an integrated controller that makes this distribution of data much more efficient by operating faster.

As with multiple-core processors, this trend is already under way -- Intel, for instance, has announced that its Nehalem CPU microarchitecture, set to debut later this year, will feature an integrated memory controller, eliminating the need for a front-side bus. However, it will take a long time for this trend to reach CPUs used in notebook computers -- the 2015 time frame seems reasonable, the experts agreed.


Storage

With most notebooks having built-in wireless broadband connections, a new onslaught of data is expected. As a result, where we'll store our accumulated files will be transformed.

According to Intel's Trainor, we'll see ever-more storage capacity in smaller and smaller packages, along with solid-state memory that is lighter and faster, while being more rugged and using less power.

Currently, adding 64GB of solid state capacity to a notebook's hard drive runs an extra $1,000. By 2015, the typical mainstream notebook could be outfitted with a 2TB hard disk drive, which should be plenty of room for even the biggest data hog, the experts speculated. For smaller and lighter machines, look to having something like 250GB of flash memory at your disposal, but it will likely come at a small premium.

There will be a new type of storage as well that has can boost performance, said Intel's Trainor. Currently, with Windows Vista, a USB flash memory key can act as an intermediate data cache for the system's hard drive.

This makes the most-used data more quickly available for the processor, streamlining its operation. Called Turbo or Robson memory, this technique will go into overdrive when the flash memory is put on the motherboard for faster access, Trainor noted.


Displays

We'll look at our notebooks in a different light in 2015 as sequential red, green, blue LED backlighting replaces the cold cathode fluorescent lighting tubes found in today's LCD screens. This technology will not only offer brighter images, but will also use less power.

Ultimately, organic LEDs will take over, although they may not be ready in time for a 2015 system in the sizes and quantities required for mass production. Because they make their own light, OLEDs can be made thinner than today's screens.

OLED Laptop
These screens have been used on phones for several years, and Sony's XEL-1 is the first TV to have an OLED display. Its 11-in. OLED screen is just over a tenth of an inch thick.
"We're very excited about OLEDs," said Trainor. "They're capable of producing beautiful, rich colors and using less power. It adds another choice."
In a more speculative vein, in seven years, we just might have 3-D displays that show the world as it really is. This will not only be great for gamers, but it can aid in representing complex data and displaying computer-aided designs.

Such displays could also revamp the way we interact with our desktops. Imagine an on-screen desktop that, rather than a flat expanse, has depth and perspective so that you can hide your list of passwords behind the icon for opening your Web browser.


More, better power

Most experts agree that future notebooks will be just as limited by battery life as they are now. But that doesn't mean we won't see significant advances in mobile power supplies -- such advances will be necessary to keep up with all the extra power.

While fuel cells that turn methanol into power showed promise over the past few years, batteries will continue to dominate the power scene. However, there will be a move from lithium-ion cells that have to be made in cylinders to lithium polymer cells that can be formed in a variety of shapes and sizes.
"This allows notebook designers to fill small nooks and crannies of a notebook with extra batteries," explained Trainor.
Powering up could also change with inductive charging, which is key to both the Compenion and Cario concept notebooks. Rather than plugging a cord into the notebook to charge it, you just put the notebook on a special surface that has an inductive power pad, and juice is sent wirelessly to charge the battery.

The payoff is that there's no AC power adapter to carry, but this new method of charging devices will work only if enough charging pads are available. They'd need to be at cafes, hotels and even on airliner tray tables. This technology is ready today, although it is a long way from being adopted widely enough to be useful.

"Inductive charging," said Lopez, "would allow easy access and a secure way to charge."

An innovative mobile approach to power is taken by Nikola Knezevic, a Serbian designer who has turned the clamshell format on its head with solar panels. His concept design, called, not surprisingly, the Solar Laptop Concept, has an extra hinged lid covered with solar cells that can be adjusted to get the most out of the sun.

Solar Laptop
It'll add a few tenths of an inch to the system's thickness and won't be able to fully charge the system, but when you're done, just fold it up and go.

Still, Trainor, who avidly follows developments of technologies such as solar power, cautioned against becoming too optimistic that this type of technology will make it easier to keep laptops of the future charged.


Thursday, March 27, 2008

How to Fix Dead Pixels on LCD Screen

LCD screens are the most likely component to contain noticeable flaws in the form of the dreaded dead pixels. There are 3.9 million sub-pixels (red, green and blue) on a standard 1280x1024 resolution LCD monitor, and each of these is a transistor. Occasionally these individual transistors responsible for carrying current to a pixel will either short out or remain open resulting in what is called a dead pixel. Dead pixels are rare and largely go unnoticed by the user.


A "lit" pixel is one that appears as one of several randomly placed white, red, blue or green pixel elements on a dark background, or you may have a "missing" pixel which shows up as a black dot on a light colored background. Apple prefers to call it "pixel anomaly".

Dead Pixel Locator is a neat utiltiy to check the LCD monitor or plasma display for dead pixels. It checks the LCD screen for dead pixels and displays the faulty pixels in a color different than the background color.

How we can fix dead pixels? Fixing dead pixels may involve a bit of luck. If you notice dead pixels, try rubbing the LCD screen area gently by pressing a finger gently through a rag around the pixel.

Remember that notebook manufacturer have their own policy on how many dead pixels warrants a return and replacement. Dell considers a screen defective only if it has six or more faulty pixels. The problem is, most people are not aware of this policy before they get their notebook and falsely assume that one dead pixel is good enough to ask for a replacement, but this is generally not the case.

You can get Dead Pixel Locator by download it at Here.

Wednesday, February 20, 2008

How to setup and assembly CISS for Epson R210/230 Printer

The following is a mini-guide on how to setup the CISS for 6-color Epson R210/R230 printer. (4-color CISS setup is almost similar)

Preparation
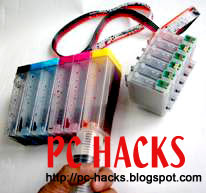
You will need a syringe that can be bought from any Mercury drug store. One syringe is enough. Below is a photo of the accessories that should come with your CISS.


Ink Filling
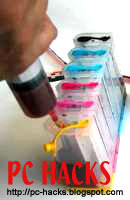
You need to extract only 60ml of ink into the syringe and start filling each tank with the appropriate ink. (just wash the syringe for each ink transfer)


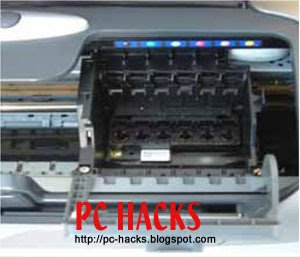
Once the tanks are filled, close the ink hole with the rubber stopper (they are color coded anyway) then lay the tanks in such a way that the air hole is above the ink hole. Now is the time for you to insert the syringe in the air hole and start sucking air slowly. You will notice that the ink from the tank will flow automatically to the cartridges. Please ensure that the smaller rubber stopper are already in place on the cartridges. (see the below picture)


Once done, just close the air hole or place the air filter on each hole.


CISS Installation

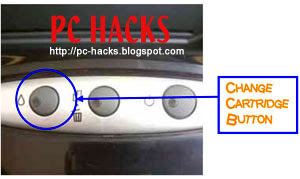
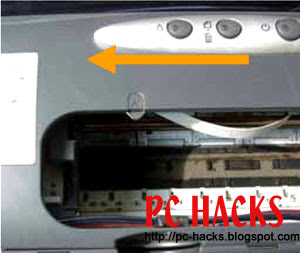
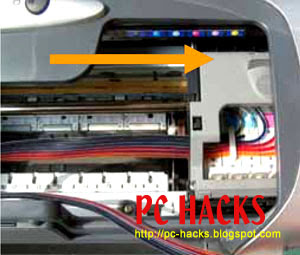
Turn on your printer and press the cartridge change button as shown on the picture below. The cartridge holder will move into the middle of the printer. With the power still on, remove the power cable from the back of the printer. This will allow the printer head to move freely back and forth in the printer.


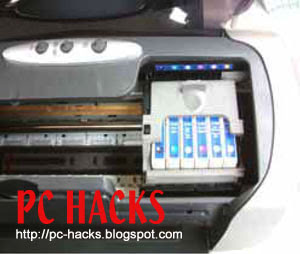
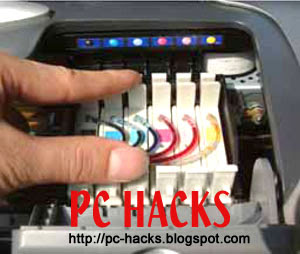
Open that cartridge holder and remove the current cartridges from the printer. Insert the CISS cartridges into your printer. PLEASE ENSURE THAT THE CARTRIDGES ARE PLACED IN THE CORRECT COLOR CARTRIDGE HOLDER.


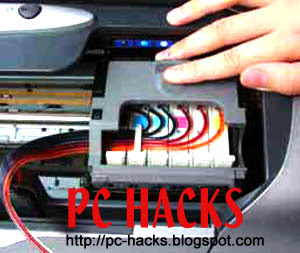
Close the cartridge holder ensuring not to twist any of the tubing.


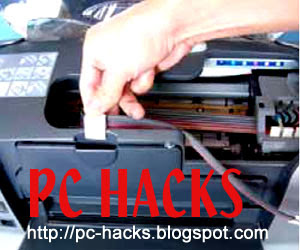
Place the tube clip onto the front of the printer. It should be placed so that the back of the clip is slotted into the groove of the CD printing tray. Be careful not to twist the tubing in any way.


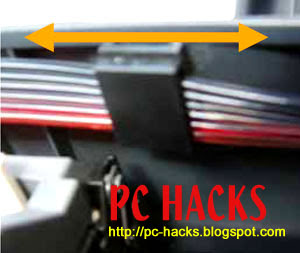
Adjustments to the tube length may be required. To check this, move the cartridge holder left and right to each end of the printer. It should reach both ends with ease. Check that the tubing is neither too long nor to short. The tubing should not interfere with the printer data wire nor should it fall down into the paper support


If required, adjust the tube length by gently pulling the tubing thru the clip in the direction required.


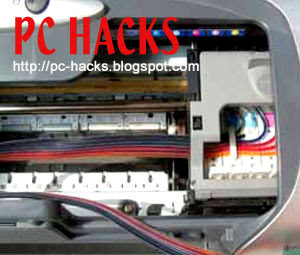
Run the tubing along the inside of the printer as shown below. Remove the backing to the tape on the clip assembly (see the accessories pic) and place it like shown below.


Reconnect the power cable to the rear of your printer and perform a head clean and nozzle check. Please bear in mind that this may need to be performed several times until you get a good test print.

CAUTION: DO NOT PLACE THE TANKS HIGHER OR LOWER THAN THE PRINTER. This will affect the ink flow and may cause ink flooding.

I hope this is easy enough for you.

Sunday, January 6, 2008

How To Increase Hard Disk Speed

To speed up your hard disk speed we need to configure a special buffer in the computer's memory in order to enable it to better deal with interrupts made from the disk. This tip is only recommended if you have 256 MB RAM or higher.
Follow these steps:
  • Run SYSEDIT.EXE from the Run command.
  • Expand the system.ini file window.
  • Scroll down almost to the end of the file till you find a line called [386enh].
  • Press Enter to make one blank line, and in that line type: Irq14=4096
  • Note: This line is CASE SENSITIVE!!!
  • Click on the File menu, then choose Save.
  • Close SYSEDIT and reboot your computer.
  • Done.
Speed improvement will be noticed after the computer reboots.

Update: The most speed improvement is visible with IDE drives, however there are reports that this tweak also does good for SCSI disks. In any case, it won't harm your system, so why not try it yourself and let me know what you find.


Saturday, October 20, 2007

World Smallest Luxury USB Stick: 4GB Bissol


Blinged-out USB flash drives are nothing new, really, since, for some strange reason, the number of people ready and willing to cough up huge amounts of cash in order to purchase something that acts more like a piece of jewelry than a technological device has seriously increased.

And this is also the reason why the Canadians at Bissol came up with their Luxury Memory Sticks, which provide 4 GB of storage space in a shiny and attractive package.

Obviously, the main selling point of the device is its external casing. Thus, the drive sports a machined solid brass body, available in 2 models: brass (gold color) and electroless nickel coated brass (silver color). Furthermore, the drive offers users 4 GB of storage capacity, which makes it a rather average (or mid-range, if you will) device, but, after all, it's quite clear that this particular drive will be used mostly for showing off, rather than actually carrying around the users' data.

As all the other USB flash drives on the market, the device from Bissol connects to a host computer via an USB 2.0 interface, which means that it can attain data transfer rates of up to 480 Mbps, without requiring any external power sources. Furthermore, the drive supports the ReadyBoost feature from Windows Vista, which means that its 4 GB can be used as additional RAM memory, thus increasing a system's overall performance without the addition of expensive RAM modules.

As mentioned earlier, the manufacturer claims that its luxury memory stick is among the world's tiniest and it seems that this thing actually has the specs to prove it, as the device measures around 28.9mm × 12.4mm × 2.2mm, at an overall weight of just around 3.6 grams.

Quite obviously, a device that contains "world's tiniest" and "luxury" in its description can't come cheap and that's exactly the case with the drive from Bissol. Thus, the Bissol Luxury USB Memory Stick retails for around 260 US dollars, which is a huge price to pay for such an item since, for example, a normal 16 GB drive can be found at around 200 US dollars.

Friday, September 21, 2007

Recovering a Corrupt AMI BIOS chip

With motherboards that use BOOT BLOCK BIOS it is possible to recover a corrupted BIOS because the BOOT BLOCK section of the BIOS, which is responsible for booting the computer remains unmodified.

When an AMI BIOS becomes corrupt the system will appear to start, but nothing will appear on the screen, the floppy drive light will come on and the system will access the floppy drive repeatedly. If your motherboard has an ISA slot and you have an old ISA video card lying around, put the ISA video card in your system and connect the monitor.

The BOOT BLOCK section of the BIOS only supports ISA video cards, so if you do not have an ISA video card or your motherboard does not have ISA slots, you will have to restore your BIOS blind, with no monitor to show you what’s going on.


AMI has integrated a recovery routine into the BOOT BLOCK of the BIOS, which in the event the BIOS becomes corrupt can be used to restore the BIOS to a working state.

The routine is called when the SYSTEM BLOCK of the BIOS is empty. The restore routine will access the floppy drive looking for a BIOS file names AMIBOOT.ROM, this is why the floppy drive light comes on and the drive spins.

If the file is found it is loaded into the SYSTEM BLOCK of the BIOS to replace the missing information. To restore your BIOS simply copy a working BIOS file to a floppy diskette and rename it AMIBOOT.ROM, then insert it into the computer while the power is on.

The diskette does not need to be bootable or contain a flash utility. After about four minutes the system will beep four times. Remove the floppy diskette from the drive and reboot the computer. The BIOS should now be restored.


Recovering a Corrupt AWARD BIOS

With AWARD BIOS the process is similar but still a bit different. To recover an AWARD BIOS you will need to create a floppy diskette with a working BIOS file in .BIN format, an AWARD flash utility and an AUTOEXEC.BAT file. AWARD BIOS will not automatically restore the BIOS information to the SYSTEM BLOCK for this reason you will need to add the commands necessary to flash the BIOS in the AUTOEXEC.BAT file.

The system will run the AUTOEXE.BAT file, which will in turn flash the BIOS. This is fairly easy. Here are the steps you need to take.


· Create a bootable floppy diskette
· Copy the BIOS file and flash utility to the diskette
· Create an text file with any standard text editor and add the following lines

@ECHO OFF
FLASH763 BIOSFILE.BIN /py

In the above example I am assuming that you are using the FLASH763.EXE flash utility. You will need to replace the FLASH763 with the name of whatever flash utility you are using, and replace the BIOSFILE.BIN with the name of the BIOS file you are using.

You will also need to change the ‘/py’ to whatever the command is for your flash utility to automatically program the BIOS without user intervention. If you do not know the command to automatically flash your BIOS type the name of the flash utility with a space and then /? to display the utility’s help
Publish Postscreen.

The help screen should pecify the command switch to automatically flash your BIOS. If you are using the FLASH763.EXE utility then the switch to automatically flash your BIOS is ‘/py’.

Boot Block Recovery For Free

You don't need to pay a measly sum of dollars just to recover from a boot block mode. Here it is folks:

AWARD Bootblock recovery:

That shorting trick should work if the boot block code is not corrupted, and it should not be if /sb switch is used when flashing the bios (instead of /wb switch).

The 2 pins to short to force a checksum error varies from chip to chip. But these are usually the highest-numbered address pins (A10 and above).

These are the pins used by the system to read the System BIOS (original.bin for award v6), calculate the ROM checksum and see if it's valid before decompressing it into memory, and subsequently allow Bootblock POST to pass control over to the System BIOS.


You just have to fool the system into believing that the System BIOS is corrupt. This you do by giving your system a hard time reading the System BIOS by shorting the 2 high address pins. And when it could not read the System BIOS properly, ROM Checksum Error is detected "so to speak" and Bootblock recovery is activated.

Sometimes, any combination of the high address pins won't work to force a checksum error in some chips, like my Winbond W49F002U. But shorting the #WE pin with the highest-numbered address pin (A17) worked for this chip. You just have to be experimentative if you're not comfortable with "hot flashing" or "replacement BIOS".

But to avoid further damage to your chip if you're not sure which are the correct pins to short, measure the potential between the 2 pins by a voltmeter while the system is on. If the voltage reading is zero (or no potential at all), it is safe to short these pins.

But do not short the pins while the system is on. Instead, power down then do the short, then power up while still shorting. And as soon as you hear 3 beeps (1 long, 2 short), remove the short at once so that automatic reflashing from Drive A can proceed without errors (assuming you had autoexec.bat in it).

About how to do the shorting, the tip of a screwdriver would do. But with such minute pins on the PLCC chip, I'm pretty comfortable doing it with the tip of my multi-tester or voltmeter probe. Short the pins at the point where they come out of the chip.


AMIBIOS Recovery bootblock:

  • Copy a known working BIOS image for your board to a floppy and rename it to AMIBOOT.ROM.
  • Insert the floppy in your system's floppydrive.
  • Power on the system while holding CTRL+Home keys. Release the keys when you hear a beep and/or see the floppy light coming on.
  • Just wait until you hear 4 beeps. When 4 beeps are heard the reprogramming of the System Block BIOS went succesfull, so then you may restart your system.
Some alternative keys that can be used to force BIOS update (only the System Block will be updated so it's quite safe):

  • CTRL+Home= restore missing code into system block and clear CMOS when programming went ok.
  • CTRL+Page Up= restore missing code into system block and clear CMOS or DMI when programming went ok.
  • CTRL+Page Down= restore missing code into system block and do not clear CMOS and DMI area when programming went ok.
Btw: the alternative keys work only with AMIBIOS 7 or higher (so for example an AMI 6.26 BIOS can be only recovered by using CTRL+Home keys).


Monday, August 20, 2007

BIOS Beep Error Codes

After repeated requests for beep codes i have decided to post them here maybe they could be pinned

Standard Original IBM POST Error Codes
Code Description

1 short beep System is OK
2 short beeps POST Error - error code shown on screen No beep Power supply or system board problem Continuous beep Power supply, system board, or keyboard problem Repeating short beeps Power supply or system board problem
1 long, 1 short beep System board problem
1 long, 2 short beeps Display adapter problem (MDA, CGA)
1 long, 3 short beeps Display adapter problem (EGA)
3 long beeps 3270 keyboard card
IBM POST Diagnostic Code Descriptions
Code Description
100 - 199 System Board
200 - 299 Memory
300 - 399 Keyboard
400 - 499 Monochrome Display
500 - 599 Colour/Graphics Display
600 - 699 Floppy-disk drive and/or Adapter
700 - 799 Math Coprocessor
900 - 999 Parallel Printer Port
1000 - 1099 Alternate Printer Adapter
1100 - 1299 Asynchronous Communication Device, Adapter, or Port
1300 - 1399 Game Port
1400 - 1499 Colour/Graphics Printer
1500 - 1599 Synchronous Communication Device, Adapter, or Port
1700 - 1799 Hard Drive and/or Adapter
1800 - 1899 Expansion Unit (XT)
2000 - 2199 Bisynchronous Communication Adapter
2400 - 2599 EGA system-board Video (MCA)
3000 - 3199 LAN Adapter
4800 - 4999 Internal Modem
7000 - 7099 Phoenix BIOS Chips
7300 - 7399 3.5" Disk Drive
8900 - 8999 MIDI Adapter
11200 - 11299 SCSI Adapter
21000 - 21099 SCSI Fixed Disk and Controller
21500 - 21599 SCSI CD-ROM System

AMI BIOS Beep Codes
Code Description

1 Short Beep System OK
2 Short Beeps Parity error in the first 64 KB of memory
3 Short Beeps Memory failure in the first 64 KB
4 Short Beeps Memory failure in the first 64 KB Operational of memory
or Timer 1 on the motherboard is not functioning
5 Short Beeps The CPU on the motherboard generated an error
6 Short Beeps The keyboard controller may be bad. The BIOS cannot switch to protected mode
7 Short Beeps The CPU generated an exception interrupt
8 Short Beeps The system video adapter is either missing, or its memory is faulty
9 Short Beeps The ROM checksum value does not match the value encoded in the BIOS
10 Short Beeps The shutdown register for CMOS RAM failed
11 Short Beeps The external cache is faulty
1 Long, 3 Short Beeps Memory Problems
1 Long, 8 Short Beeps Video Card Problems

Phoenix BIOS Beep Codes
Note - Phoenix BIOS emits three sets of beeps, separated by a brief pause.

Code Description
1-1-3 CMOS read/write failure
1-1-4 ROM BIOS checksum error
1-2-1 Programmable interval timer failure
1-2-2 DMA initialisation failure
1-2-3 DMA page register read/write failure
1-3-1 RAM refresh verification failure
1-3-3 First 64k RAM chip or data line failure
1-3-4 First 64k RAM odd/even logic failure
1-4-1 Address line failure first 64k RAM
1-4-2 Parity failure first 64k RAM
2-_-_ Faulty Memory
3-1-_ Faulty Motherboard
3-2-4 Keyboard controller Test failure
3-3-4 Screen initialisation failure
3-4-1 Screen retrace test failure
3-4-2 Search for video ROM in progress
4-2-1 Timer tick interrupt in progress or failure
4-2-2 Shutdown test in progress or failure
4-2-3 Gate A20 failure
4-2-4 Unexpected interrupt in protected mode
4-3-1 RAM test in progress or failure>ffffh
4-3-2 Faulty Motherboard
4-3-3 Interval timer channel 2 test or failure
4-3-4 Time of Day clock test failure
4-4-1 Serial port test or failure
4-4-2 Parallel port test or failure
4-4-3 Math coprocessor test or failure
Low 1-1-2 System Board select failure
Low 1-1-3 Extended CMOS RAM failure

10 reasons why PCs crash U must Know

Fatal error: the system has become unstable or is busy," it says. "Enter to return to Windows or press Control-Alt-Delete to restart your computer. If you do this you will lose any unsaved information in all open applications."

You have just been struck by the Blue Screen of Death. Anyone who uses Mcft Windows will be familiar with this. What can you do? More importantly, how can you prevent it happening?

1 Hardware conflict

The number one reason why Windows crashes is hardware conflict. Each hardware device communicates to other devices through an interrupt request channel (IRQ). These are supposed to be unique for each device.

For example, a printer usually connects internally on IRQ 7. The keyboard usually uses IRQ 1 and the floppy disk drive IRQ 6. Each device will try to hog a single IRQ for itself.

If there are a lot of devices, or if they are not installed properly, two of them may end up sharing the same IRQ number. When the user tries to use both devices at the same time, a crash can happen. The way to check if your computer has a hardware conflict is through the following route:

* Start-Settings-Control Panel-System-Device Manager.

Often if a device has a problem a yellow '!' appears next to its description in the Device Manager. Highlight Computer (in the Device Manager) and press Properties to see the IRQ numbers used by your computer. If the IRQ number appears twice, two devices may be using it.

Sometimes a device might share an IRQ with something described as 'IRQ holder for PCI steering'. This can be ignored. The best way to fix this problem is to remove the problem device and reinstall it.

Sometimes you may have to find more recent drivers on the internet to make the device function properly. A good resource is www.driverguide.com. If the device is a soundcard, or a modem, it can often be fixed by moving it to a different slot on the motherboard (be careful about opening your computer, as you may void the warranty).

When working inside a computer you should switch it off, unplug the mains lead and touch an unpainted metal surface to discharge any static electricity.

To be fair to Mcft, the problem with IRQ numbers is not of its making. It is a legacy problem going back to the first PC designs using the IBM 8086 chip. Initially there were only eight IRQs. Today there are 16 IRQs in a PC. It is easy to run out of them. There are plans to increase the number of IRQs in future designs.

2 Bad Ram

Ram (random-access memory) problems might bring on the blue screen of death with a message saying Fatal Exception Error. A fatal error indicates a serious hardware problem. Sometimes it may mean a part is damaged and will need replacing.

But a fatal error caused by Ram might be caused by a mismatch of chips. For example, mixing 70-nanosecond (70ns) Ram with 60ns Ram will usually force the computer to run all the Ram at the slower speed. This will often crash the machine if the Ram is overworked.

One way around this problem is to enter the BIOS settings and increase the wait state of the Ram. This can make it more stable. Another way to troubleshoot a suspected Ram problem is to rearrange the Ram chips on the motherboard, or take some of them out. Then try to repeat the circumstances that caused the crash. When handling Ram try not to touch the gold connections, as they can be easily damaged.

Parity error messages also refer to Ram. Modern Ram chips are either parity (ECC) or non parity (non-ECC). It is best not to mix the two types, as this can be a cause of trouble.

EMM386 error messages refer to memory problems but may not be connected to bad Ram. This may be due to free memory problems often linked to old Dos-based programmes.

3 BIOS settings

Every motherboard is supplied with a range of chipset settings that are decided in the factory. A common way to access these settings is to press the F2 or delete button during the first few seconds of a boot-up.

Once inside the BIOS, great care should be taken. It is a good idea to write down on a piece of paper all the settings that appear on the screen. That way, if you change something and the computer becomes more unstable, you will know what settings to revert to.

A common BIOS error concerns the CAS latency. This refers to the Ram. Older EDO (extended data out) Ram has a CAS latency of 3. Newer SDRam has a CAS latency of 2. Setting the wrong figure can cause the Ram to lock up and freeze the computer's display.

Mcft Windows is better at allocating IRQ numbers than any BIOS. If possible set the IRQ numbers to Auto in the BIOS. This will allow Windows to allocate the IRQ numbers (make sure the BIOS setting for Plug and Play OS is switched to 'yes' to allow Windows to do this.).

4 Hard disk drives

After a few weeks, the information on a hard disk drive starts to become piecemeal or fragmented. It is a good idea to defragment the hard disk every week or so, to prevent the disk from causing a screen freeze. Go to

* Start-Programs-Accessories-System Tools-Disk Defragmenter

This will start the procedure. You will be unable to write data to the hard drive (to save it) while the disk is defragmenting, so it is a good idea to schedule the procedure for a period of inactivity using the Task Scheduler.

The Task Scheduler should be one of the small icons on the bottom right of the Windows opening page (the desktop).

Some lockups and screen freezes caused by hard disk problems can be solved by reducing the read-ahead optimisation. This can be adjusted by going to

* Start-Settings-Control Panel-System Icon-Performance-File System-Hard Disk.

Hard disks will slow down and crash if they are too full. Do some housekeeping on your hard drive every few months and free some space on it. Open the Windows folder on the C drive and find the Temporary Internet Files folder. Deleting the contents (not the folder) can free a lot of space.

Empty the Recycle Bin every week to free more space. Hard disk drives should be scanned every week for errors or bad sectors. Go to

* Start-Programs-Accessories-System Tools-ScanDisk

Otherwise assign the Task Scheduler to perform this operation at night when the computer is not in use.

5 Fatal OE exceptions and VXD errors

Fatal OE exception errors and VXD errors are often caused by video card problems.

These can often be resolved easily by reducing the resolution of the video display. Go to

* Start-Settings-Control Panel-Display-Settings

Here you should slide the screen area bar to the left. Take a look at the colour settings on the left of that window. For most desktops, high colour 16-bit depth is adequate.

If the screen freezes or you experience system lockups it might be due to the video card. Make sure it does not have a hardware conflict. Go to

* Start-Settings-Control Panel-System-Device Manager

Here, select the + beside Display Adapter. A line of text describing your video card should appear. Select it (make it blue) and press properties. Then select Resources and select each line in the window. Look for a message that says No Conflicts.

If you have video card hardware conflict, you will see it here. Be careful at this point and make a note of everything you do in case you make things worse.

The way to resolve a hardware conflict is to uncheck the Use Automatic Settings box and hit the Change Settings button. You are searching for a setting that will display a No Conflicts message.

Another useful way to resolve video problems is to go to

* Start-Settings-Control Panel-System-Performance-Graphics

Here you should move the Hardware Acceleration slider to the left. As ever, the most common cause of problems relating to graphics cards is old or faulty drivers (a driver is a small piece of software used by a computer to communicate with a device).

Look up your video card's manufacturer on the internet and search for the most recent drivers for it.

6 Viruses

Often the first sign of a virus infection is instability. Some viruses erase the boot sector of a hard drive, making it impossible to start. This is why it is a good idea to create a Windows start-up disk. Go to

* Start-Settings-Control Panel-Add/Remove Programs

Here, look for the Start Up Disk tab. Virus protection requires constant vigilance.

A virus scanner requires a list of virus signatures in order to be able to identify viruses. These signatures are stored in a DAT file. DAT files should be updated weekly from the website of your antivirus software manufacturer.

An excellent antivirus programme is McAfee VirusScan by Network Associates ( www.nai.com). Another is Norton AntiVirus 2000, made by Symantec ( www.symantec.com).

7 Printers

The action of sending a document to print creates a bigger file, often called a postscript file.

Printers have only a small amount of memory, called a buffer. This can be easily overloaded. Printing a document also uses a considerable amount of CPU power. This will also slow down the computer's performance.

If the printer is trying to print unusual characters, these might not be recognised, and can crash the computer. Sometimes printers will not recover from a crash because of confusion in the buffer. A good way to clear the buffer is to unplug the printer for ten seconds. Booting up from a powerless state, also called a cold boot, will restore the printer's default settings and you may be able to carry on.

8 Software

A common cause of computer crash is faulty or badly-installed software. Often the problem can be cured by uninstalling the software and then reinstalling it. Use Norton Uninstall or Uninstall Shield to remove an application from your system properly. This will also remove references to the programme in the System Registry and leaves the way clear for a completely fresh copy.

The System Registry can be corrupted by old references to obsolete software that you thought was uninstalled. Use Reg Cleaner by Jouni Vuorio to clean up the System Registry and remove obsolete entries. It works on Windows 95, Windows 98, Windows 98 SE (Second Edition), Windows Millennium Edition (ME), NT4 and Windows 2000.

Read the instructions and use it carefully so you don't do permanent damage to the Registry. If the Registry is damaged you will have to reinstall your operating system. Reg Cleaner can be obtained from www.jv16.org

Often a Windows problem can be resolved by entering Safe Mode. This can be done during start-up. When you see the message "Starting Windows" press F4. This should take you into Safe Mode.

Safe Mode loads a minimum of drivers. It allows you to find and fix problems that prevent Windows from loading properly.

Sometimes installing Windows is difficult because of unsuitable BIOS settings. If you keep getting SUWIN error messages (Windows setup) during the Windows installation, then try entering the BIOS and disabling the CPU internal cache. Try to disable the Level 2 (L2) cache if that doesn't work.

Remember to restore all the BIOS settings back to their former settings following installation.

9 Overheating

Central processing units (CPUs) are usually equipped with fans to keep them cool. If the fan fails or if the CPU gets old it may start to overheat and generate a particular kind of error called a kernel error. This is a common problem in chips that have been overclocked to operate at higher speeds than they are supposed to.

One remedy is to get a bigger better fan and install it on top of the CPU. Specialist cooling fans/heatsinks are available from www.computernerd.com or www.coolit.com

CPU problems can often be fixed by disabling the CPU internal cache in the BIOS. This will make the machine run more slowly, but it should also be more stable.

10 Power supply problems

With all the new construction going on around the country the steady supply of electricity has become disrupted. A power surge or spike can crash a computer as easily as a power cut.

If this has become a nuisance for you then consider buying a uninterrupted power supply (UPS). This will give you a clean power supply when there is electricity, and it will give you a few minutes to perform a controlled shutdown in case of a power cut.

It is a good investment if your data are critical, because a power cut will cause any unsaved data to be lost.