Flat screen LCD 's have the perfect shape for putting it up on the wall, this preserves space and can be viewed as a peice of art when above the mantle or with other pieces of art. The mounts for LCD
 s have several types that will be discussed in this article. They can be either fixed or variable, of course as the name implies the fixed mount doesn't move. A fixed mount is a very sleek look since the television is only an inch from the wall, but this is best used where the seating in the viewing room is a fixed place.

The variable type wall mount is best is someone wants to be able to adjust the television. For just slight movement a tilt wall mount will work, it will permit some movement perfect for a case where there is a light glare issue, or if there are children watching, it can be tilted toward the floor. This tilt wall mount can be hand adjusted or with a tool, this one will cost a little more than the fixed mount.
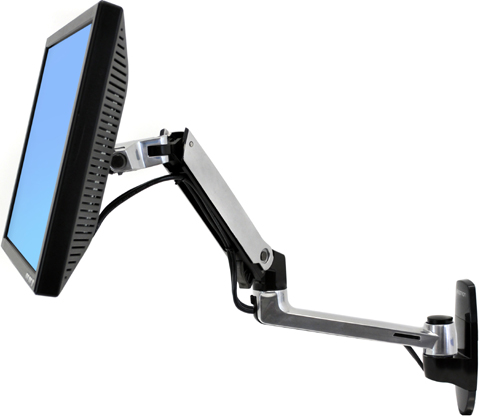
For full motion you may want to look into a type of variable wall mount that has arms, which allow you to move the television up and down, back and forth along with left and right. Amazingly a number of these types of mounts come with a remote control that allows the television to be moved from where you sit, a huge convenience. In addition, there are ceiling mounts which offer a unique look, in case there's not a way to mount it on the wall.
There are pros and cons for every wall mount available. A fixed mount will not have adjustability but it will carry a greater weight. The further the TV gets from the wall the less steady it becomes, as even the smaller LCDs are around fifty pounds. A heavier, bigger television will have to have a much sturdier wall mount, and this will drive up the cost, especially if it's adjustable.
Research and shop carefully for your wall mount as they are not all the same, it must be appropriate for the size and weight of your LCD. There are matching wall mounts available from the manufacturers but these often cost more than those built by a third party company. Investigate all aspects of the wall mount including looking at the room where it's going to be mounted to make sure it's the right one. If you make a good decision about what type and where to put it, then your viewing experience is going to be enhanced.