Showing posts with label pc hack. Show all posts

Sunday, December 28, 2008

How to Hack Into a Windows XP Computer Without Changing Password

Another method to login to a password protected Windows even if you do not have the password is by making Windows accepting any passwords.


There is a far better way to get into Windows XP. It is easy and it does not reset the password. Hack into a computer running Windows XP without changing the password and find out all and any passwords on the machine (including admin accounts). You do not need access to any accounts to do this. Of course, do not do this on anyone elses computer without proper authorization.

Steps to Hack into a Windows XP Computer without changing password:

1. Get physical access to the machine. Remember that it must have a CD or DVD drive.
2.Download this archive file (Size: 4.5 Mb).
3. Unzip the downloaded PCHaCKs-DreamPack.zip and you’ll get dpl.ISO.
4. Use any burning program that can burn ISO images like UltraISO, PowerISO or Nero.
5. After you have the disk, boot from the CD or DVD drive. You will see Windows 2000 Setup and it will load some files.
6. Press “R” to install DreamPackPL.
7. Press “C” to install DreamPackPL by using the recovery console.
8. Select the Windows installation that is currently on the computer (Normally is “1″ if you only have one Windows installed)
9. Backup your original sfcfiles.dll by typing:
ren C:\Windows\System32\sfcfiles.dll sfcfiles.lld” (without quotes)
10. Copy the hacked file from CD to system32 folder. Type:
copy D:\i386\pinball.ex_ C:\Windows\System32\sfcfiles.dll” (without quotes and assuming your CD drive is D:)
11. Type “exit”, take out disk and reboot.
12. In the password field, type “dreamon” (without quotes) and DreamPack menu will appear.
13. Click the top graphic on the DreamPack menu and you will get a menu popup.
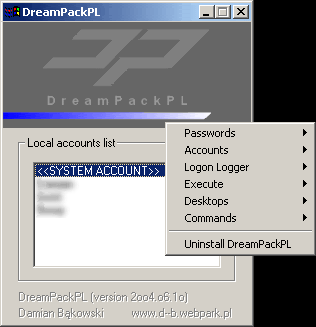


14. Go to commands and enable the options and enable the god command.
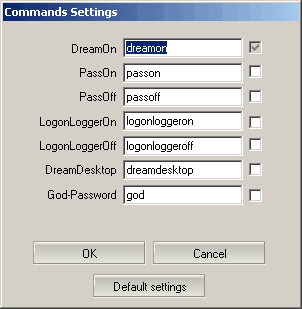


15. Type “god” in the password field to get in Windows.

You can also go to Passwords and select “Logon with wrong password and hash”. This option allows you to login with ANY password.

Note: I was unable to bring up the DreamPackPL for the first time because I have Kaspersky Anti-Virus already running in background. I believe most antivirus already labeled this tool as a Hack-Tool. A Hack-Tool is NOT a virus. DreamPackPL helps you bypass the Windows Login screen and it is not destructive.

Wednesday, October 22, 2008

How To Change Your Motherboard Battery

First the safety rules!

The inside of a computer is a bad place full of electricity and sharp edges.
On the electricity side always when working on you computer make sure that it’s still plugged in to the power socket and the power is turned off, this is to ensure that any static
From you is discharged through the earth. The inside of most computer cases are unfinished metal and has very sharp edges so be careful.

The first signs of a battery failing are:

  • Your clock starts running slowly
  • When you boot (start) your computer it has a problem finding your hardware (no hard drive, no cd rom)

To change the battery you need the following tools:

  • a X-point screwdriver
  • an anti-static strap(optional)
  • a new battery (seems logical)

Then unplug all the cables from the back of the computer as you remove them make a note where they came from. (So when you finished you can put them back).

Move the computer somewhere where you can work on it with ease
Remove the cover by locating the screws around the outer edge (back) of the computer
Some computer cases only require you to remove 2 screws on one side then a panel can be removed allowing you access to the computers insides, others you must remove 6 screws and remove the whole case by sliding it to the rear and lifting it off.


Now make sure that you read the safety instructions about static.
Look inside you will see a round silver thing that looks about the size of a 10p piece (quarter). This is the battery itself, carefully lift the retaining clip and slide the battery out. That’s it removed now go to your local computer retailer, electrical retailer (Tandy/Radio shack) taking the old battery with you and get a new battery.
Back to your computer insert the new battery by lifting the clip and sliding the battery in.


Reinstall your case and plug all the cables back (you did remember to label them didn’t you)
Turn on your PC. You will now need to go into you bios….
Right the bios is the god of your computer. To access it, when your computer first starts you will see a black screen with white text.
If you look carefully you will see a line that says something like "press del for setup" or some other key (F2 or ESC or tab) this will take you to god's house where you can make lots of changes to the way your machine works.


It is also the place where you can make your nice computer in to a rather expensive door stop so be careful and don’t go playing with anything.
You will now be presented with a blue screen with a lot of options on it, the one we want is Load Optimised / Default settings.
Press the F10 key for save setting and type Y, the computer should now reboot.
If every thing went well then your computer will now be up and running.

Extreme way (NOT RECOMMENDED):

  • Keep computer running.
  • Lay it on it's side and remove side cover to expose Motherboard.
  • Take any thin object, "small screwdriver, knife point, wood shiskabob skewer.
  • Pull back the battery retaining clip.
  • Toss the old battery in the junk receptacle, unless you belong to Greenpeace and want to save the earth.
  • Install the new battery. No need to reset bios becasue the compter supplies voltage to the CMOS while it is running.
  • Reset or resync clock with internet. Done!


Saturday, June 21, 2008

Best and fast way to Lock your computer

Lock My PC™ is an easy in use, powerful and compact tool to lock your computer from unauthorized use. When you leave your computer unattended, the program disables the hot keys (including Ctrl+Alt+Del), mouse, locks CD/DVD ROM doors and displays a lock screen. Nobody can access your system without providing the correct unlock password.


Unlike another similar computer lock software that cannot lock Ctrl+Alt+Del on a computer running Windows XP, our Lock My PC runs own keyboard driver to block such key combinations. Moreover, bulletproof startup lock guarantee that when your computer locaked at startup, this lock cannot be bypassed even in safe mode!

Why Lock My PC ?
You don't like snoopers. They are always prying into your e-mail messages, programs, data, files, etc. Lock My PC allows you to lock your computer with a password while you leave it unattended. You can lock your computer manually, with a menu or hotkey, or set up auto lock when your computer is idle.

Features and benefits:
  • Quick and safe computer lock by hot key, or mouse click
  • Autolock when computer is idle
  • Correct Ctrl+Alt+Del lock
  • Bulletproof startup lock (couldn't be bypassed in safe mode)
  • Different installation mode - setup for home or corporate use
  • CD/DVD-ROM doors lock
  • Multi-user support
  • Multimonitor support
  • Auto turnoff when computer is locked for a long time
  • Blind password option
  • Stealth mode
  • Windows XP x64 compatibility
  • Custom lock screens
  • Cycling lock screen images
  • Screen saving effects
  • Lock screen transparency - you can view movies under the locked screen
  • Password protected settings, quit and uninstall
  • Command line options
  • and many more ...

Difference from standard Windows XP computer lock feature
A lot of users believe that Lock My PC (as well as any other third party computer lock software) is useless because Windows XP has integrated computer lock feature. Well, indeed, you can simply press Win+L on Windows XP computer keyboard and your screen will be safely locked. What advantages Lock My PC has over Windows computer lock?

First of all, when your computer is locked by Windows Lock feature, anyone who has Windows Administrative privileges can unlock your computer. Such unlock will force to close your session (all unsaved changes will be lost). If Welcome screen option is enabled on your computer (the default settings for non-domain computer), Win+L doesn't lock the computer at all - it temporary switches the user off and displays the welcome screen - if you share your computer with others, they can logon with their usernames and use your computer. Moreover, if you share your account with other users (it's common for home PC), Windows XP lock feature is useless at all - your folks will unlock your computer without any problem.

Another benefits of Lock My PC in comare with Windows lock feature:
  • Custom lock screens and transparent lock screen options - your computer can be used as a presentation machine - the screen displays pictures or video, but nobody can touch your computer;
  • Secure Lock before Windows welcome/logon screen;
  • Displaying unsuccesfull unlock attempts - you will be notified if anyone tried to unlock your computer;
  • If Lock My PC is used in muilti-user mode, a supervisor can unlock the computer without closing user session;
  • You can lock CD/DVD ROM doors along with the desktop, keyboard and mouse - this can prevent CD media from being stolen while you are out;
  • Command line support allows you to use Lock My PC in Internet kiosks.

Safe and secure
Lock My PC provides reliable locking mechanism that impossible to bypass:
Keyboard driver installed with Lock My PC blocks different key combinations like Ctrl+Alt+Del, Alt+Tab, Ctrl+Esc and many others.
Booletproof startup lock ("Always lock at startup" option) displays password prompt box before Windows logon/welcome screen and (unlikle the most of desktop locking software) bannot be bypassed in Windows safe mode.

Easy to use
As soon as the installation completed, double click on the Lock My PC tray icon to lock the computer.
Right click on the tray icon to get access to the program settings. All settings are groupped by cathegoriies.

Autolock computer after certain time of inactivity
You can set up Lock My PC to lock your desktop automatically if the computer is idle during a certain period of time. Moreover you can set up Lock My PC to switch the computer off (Hibernate, Standby etc.) if your computer was locked during a certain period of time.

Stealth mode
Lock My PC can work in stealth mode. Stealth mode is a state when the program is running on your computer but does not show any sign of its presence in memory. To activate stealth mode, enable options "Do not show tray icon at startup" and "Hide Lock My PC from Task Manager".

Two installation modes
Lock My PC can be used both in single-user and multi-user environment. During the installation process, you will instruct Setup wehter to install Lock My PC in single-user mode or in multi-user mode.
In single-user mode, Setup will create Lock My PC shortcuts only for you. Locked computer can be unlocked only with your password. Some advanced options for corporate use will be blocked. This mode is ideal for home use.
In multi-user mode, Setup will create Lock My PC shortcuts for all user accounts. Each Lock My PC user will have their own password. The user who installed Lock My PC will be Lock My PC Administrator and his/her password - the administator's password. This mode is ideal for corporate use.

Custom Lock Screens
Lock My PC comes with a set of different lock screens. Lock screens are located in LockScreens subfolder of Lock My PC program folder.
You can create your own Lock Screen pictures and use them with Lock My PC. Your computer will look cool and unique when it is locked. You can use GIF, JPEG, BMP and animated GIF images as lock screens. Lock Screen transparency level option will allow you to vary the transparency from fully opaque to fully transparent. The latter allows you to lock keyboard and mouse only and may be helpful when you are watching videos or running presentations on your PC.

By the way, you can get this nice tool by downloading at Here.

Multiple and Share Your PC with BeTwin 2.43

BeTwin is a software that enables two to five users to share the computing power of a single computer, i.e. the Host PC. It creates a virtual PC station for each user to simultaneously and independently operate in each station, similar to the user operating on the Host PC. It makes use of the pre-emptive multitasking feature of the Windows operating system to fully utilize the unused processing power in processors and enables users to run the same or different applications simultaneously and independently to create and edit documents, and to share peripherals, for example, CD-ROM, printers and other hardware installed on the Host PC.


All users can also surf the Internet and access emails at the same time using only one modem, one telephone line, one ISP account and even share network access with unique customized desktop and network login.

BeTwin runs and displays information directly from DOS, Windows and Java applications of the Host PC without requiring any compression or decompression of the displayed information, thereby providing a multi-user platform for additional users to be added to a Host PC.

BeTwin provides cost benefits by reducing the user’s initial investment, cost of upgrading and cost of maintenance and service. The process of installation is quick and simple. By installing the video card into the Host PC, connecting the Universal Serial Bus keyboard, mouse, speaker and monitor and installing the BeTwin software, an additional user is added.

Btw, you can download BeTwin at Here.

Thursday, October 11, 2007

Fixing The Firefox Memory Leak

In case you didn’t know Firefox has a small memory leakage problems that can cause your pc to freeze up. Basically what happens is when you minimize Firefox it stops consuming memory, however when you maximize it again the memory usage will increase, sometimes even doubling.

Fortunately, there is a small fix that you can implement. Here's what you do:

Open Firefox and go to the Address Bar. Type in about:config and then press Enter.
Right Click in the page and select New -> Boolean.
In the box that pops up enter config.trim_on_minimize. Press Enter.
Now select True and then press Enter.
Restart Firefox.

Wuuuush! Firefox will stop eating your memory.


Hack Live Security Cameras in 2 clicks: Google Hack

View Security Cameras Worldwide. This will let you hack into random live security cameras all over the world and operate them.

Go to Google.

In the search bar type in:
Code:

inurl:"viewerframe?mode refresh"

3.Then go to any of the search results and bingo, take control over the camera, move it around, change all the setting's...

Tip: Try the camera at a place called The Poochie Pool huba huba


Here are more google hacks for security cams:

inurl:indexFrame.shtml Axis
inurl:"ViewerFrame?Mode="
intitle:snc-rz30 inurl:home/
inurl:/view/index.shtml
inurl:"ViewerFrame?Mode="
inurl:netw_tcp.shtml
intitle:"supervisioncam protocol"
inurl:CgiStart?page=Single
inurl:indexFrame.shtml?newstyle=Quad
intitle:liveapplet inurl:LvAppl
inurl:/showcam.php?camid
inurl:video.cgi?resolution=
inurl:image?cachebust=
intitle:"Live View / - AXIS"
inurl:view/view.shtml
intext:"MOBOTIX M1"
intext:"Open Menu"
intitle:snc-rz30
inurl:home/
inurl:"MultiCameraFrame?Mode="
intitle:"EvoCam" inurl:"webcam.html"
intitle:"Live NetSnap Cam-Server feed"
intitle:"Live View / - AXIS 206M"
intitle:"Live View / - AXIS 206W"
intitle:"Live View / - AXIS 210"
inurl:indexFrame.shtml Axis
inurl:"ViewerFrame?Mode="
inurl:"MultiCameraFrame?Mode=Motion"
intitle:start inurl:cgistart
intitle:"WJ-NT104 Main Page"
intext:"MOBOTIX M1" intext:"Open Menu"
intext:"MOBOTIX M10" intext:"Open Menu"
intext:"MOBOTIX D10" intext:"Open Menu"
intitle:snc-z20 inurl:home/
intitle:snc-cs3 inurl:home/
intitle:snc-rz30 inurl:home/
intitle:"sony network camera snc-p1"
intitle:"sony network camera snc-m1"
site:.viewnetcam.com -www.viewnetcam.com
intitle:"Toshiba Network Camera" user login
intitle:"netcam live image"
intitle:"i-Catcher Console - Web Monitor"
inurl:/home/home
"Kamerainformationen anzeigen"
intitle:"AXIS 2100 Network Camera Axis 2100 Network Camera 2.02"
intitle:"Linksys Web Camera" "ver"
Just copy and paste into google search. Enjoy ..

Wednesday, September 26, 2007

Tweak Aero's glass borders: Vista Hack

The borders around system windows, such as dialog boxes and the Control Panel, are transparent in Windows Vista's Aero interface. These borders are hackable; you can shrink them, make them larger, and change their colors and transparency levels.

To make the borders larger or smaller:

1. Right-click the desktop and select Personalize.

2. Click Window Color and Appearance.

3. Click Open classic appearance properties for more color options.

4. From the dialog box that appears, make sure that Windows Aero is selected as the color scheme. Click the Advanced button on the right side of the dialog box. The Advanced Appearance dialog box appears.

5. Select Border Padding in the Item drop-down menu. To change the size of the border, type a new size for the border. (The default is 4.) Click OK, then OK again. The sizes of the borders will now change.


There's more you can do to the borders as well. To change the border color, transparency and more, right-click the desktop and select Personalize > Window Color and Appearance.

1. Choose a color for your windows on the top of the screen, or custom-build a color by clicking Show color mixer and then moving the sliders that appear to mix your own color.

2. To change the transparency of window borders, move the Color intensity slider to the left to make them more translucent, and to the right to make them more opaque.

3. To turn off transparency, uncheck the box next to Enable transparency.

Friday, September 21, 2007

Recovering a Corrupt AMI BIOS chip

With motherboards that use BOOT BLOCK BIOS it is possible to recover a corrupted BIOS because the BOOT BLOCK section of the BIOS, which is responsible for booting the computer remains unmodified.

When an AMI BIOS becomes corrupt the system will appear to start, but nothing will appear on the screen, the floppy drive light will come on and the system will access the floppy drive repeatedly. If your motherboard has an ISA slot and you have an old ISA video card lying around, put the ISA video card in your system and connect the monitor.

The BOOT BLOCK section of the BIOS only supports ISA video cards, so if you do not have an ISA video card or your motherboard does not have ISA slots, you will have to restore your BIOS blind, with no monitor to show you what’s going on.


AMI has integrated a recovery routine into the BOOT BLOCK of the BIOS, which in the event the BIOS becomes corrupt can be used to restore the BIOS to a working state.

The routine is called when the SYSTEM BLOCK of the BIOS is empty. The restore routine will access the floppy drive looking for a BIOS file names AMIBOOT.ROM, this is why the floppy drive light comes on and the drive spins.

If the file is found it is loaded into the SYSTEM BLOCK of the BIOS to replace the missing information. To restore your BIOS simply copy a working BIOS file to a floppy diskette and rename it AMIBOOT.ROM, then insert it into the computer while the power is on.

The diskette does not need to be bootable or contain a flash utility. After about four minutes the system will beep four times. Remove the floppy diskette from the drive and reboot the computer. The BIOS should now be restored.


Recovering a Corrupt AWARD BIOS

With AWARD BIOS the process is similar but still a bit different. To recover an AWARD BIOS you will need to create a floppy diskette with a working BIOS file in .BIN format, an AWARD flash utility and an AUTOEXEC.BAT file. AWARD BIOS will not automatically restore the BIOS information to the SYSTEM BLOCK for this reason you will need to add the commands necessary to flash the BIOS in the AUTOEXEC.BAT file.

The system will run the AUTOEXE.BAT file, which will in turn flash the BIOS. This is fairly easy. Here are the steps you need to take.


· Create a bootable floppy diskette
· Copy the BIOS file and flash utility to the diskette
· Create an text file with any standard text editor and add the following lines

@ECHO OFF
FLASH763 BIOSFILE.BIN /py

In the above example I am assuming that you are using the FLASH763.EXE flash utility. You will need to replace the FLASH763 with the name of whatever flash utility you are using, and replace the BIOSFILE.BIN with the name of the BIOS file you are using.

You will also need to change the ‘/py’ to whatever the command is for your flash utility to automatically program the BIOS without user intervention. If you do not know the command to automatically flash your BIOS type the name of the flash utility with a space and then /? to display the utility’s help
Publish Postscreen.

The help screen should pecify the command switch to automatically flash your BIOS. If you are using the FLASH763.EXE utility then the switch to automatically flash your BIOS is ‘/py’.

Boot Block Recovery For Free

You don't need to pay a measly sum of dollars just to recover from a boot block mode. Here it is folks:

AWARD Bootblock recovery:

That shorting trick should work if the boot block code is not corrupted, and it should not be if /sb switch is used when flashing the bios (instead of /wb switch).

The 2 pins to short to force a checksum error varies from chip to chip. But these are usually the highest-numbered address pins (A10 and above).

These are the pins used by the system to read the System BIOS (original.bin for award v6), calculate the ROM checksum and see if it's valid before decompressing it into memory, and subsequently allow Bootblock POST to pass control over to the System BIOS.


You just have to fool the system into believing that the System BIOS is corrupt. This you do by giving your system a hard time reading the System BIOS by shorting the 2 high address pins. And when it could not read the System BIOS properly, ROM Checksum Error is detected "so to speak" and Bootblock recovery is activated.

Sometimes, any combination of the high address pins won't work to force a checksum error in some chips, like my Winbond W49F002U. But shorting the #WE pin with the highest-numbered address pin (A17) worked for this chip. You just have to be experimentative if you're not comfortable with "hot flashing" or "replacement BIOS".

But to avoid further damage to your chip if you're not sure which are the correct pins to short, measure the potential between the 2 pins by a voltmeter while the system is on. If the voltage reading is zero (or no potential at all), it is safe to short these pins.

But do not short the pins while the system is on. Instead, power down then do the short, then power up while still shorting. And as soon as you hear 3 beeps (1 long, 2 short), remove the short at once so that automatic reflashing from Drive A can proceed without errors (assuming you had autoexec.bat in it).

About how to do the shorting, the tip of a screwdriver would do. But with such minute pins on the PLCC chip, I'm pretty comfortable doing it with the tip of my multi-tester or voltmeter probe. Short the pins at the point where they come out of the chip.


AMIBIOS Recovery bootblock:

  • Copy a known working BIOS image for your board to a floppy and rename it to AMIBOOT.ROM.
  • Insert the floppy in your system's floppydrive.
  • Power on the system while holding CTRL+Home keys. Release the keys when you hear a beep and/or see the floppy light coming on.
  • Just wait until you hear 4 beeps. When 4 beeps are heard the reprogramming of the System Block BIOS went succesfull, so then you may restart your system.
Some alternative keys that can be used to force BIOS update (only the System Block will be updated so it's quite safe):

  • CTRL+Home= restore missing code into system block and clear CMOS when programming went ok.
  • CTRL+Page Up= restore missing code into system block and clear CMOS or DMI when programming went ok.
  • CTRL+Page Down= restore missing code into system block and do not clear CMOS and DMI area when programming went ok.
Btw: the alternative keys work only with AMIBIOS 7 or higher (so for example an AMI 6.26 BIOS can be only recovered by using CTRL+Home keys).